Rechercher

Annonce
· Mai 15, 2024

iris-medicopilot video announcement

Hello developers, 

Our project was designed to optimize patient clinical outcomes by reducing hospitalization time and supporting the development of resident and novice physicians. Additionally, it contributes to lowering financial waste in the healthcare system by improving the monitoring of pregnant patients, thereby decreasing risks and enhancing their safety.

Using the most accessible tool, the smartphone, was the obvious choice to make patients' lives easier.

Acknowledgment

Once again, we would like to thank you for the community's support of each of our applications.

If you found our app interesting and contributed some insight, please vote for iris-medicopilot and help us on this journey! laugh

2 Comments
Discussion (2)1
Connectez-vous ou inscrivez-vous pour continuer
Article
· Mai 15, 2024 9m de lecture

DNA Similarity and Classification: An Analysis

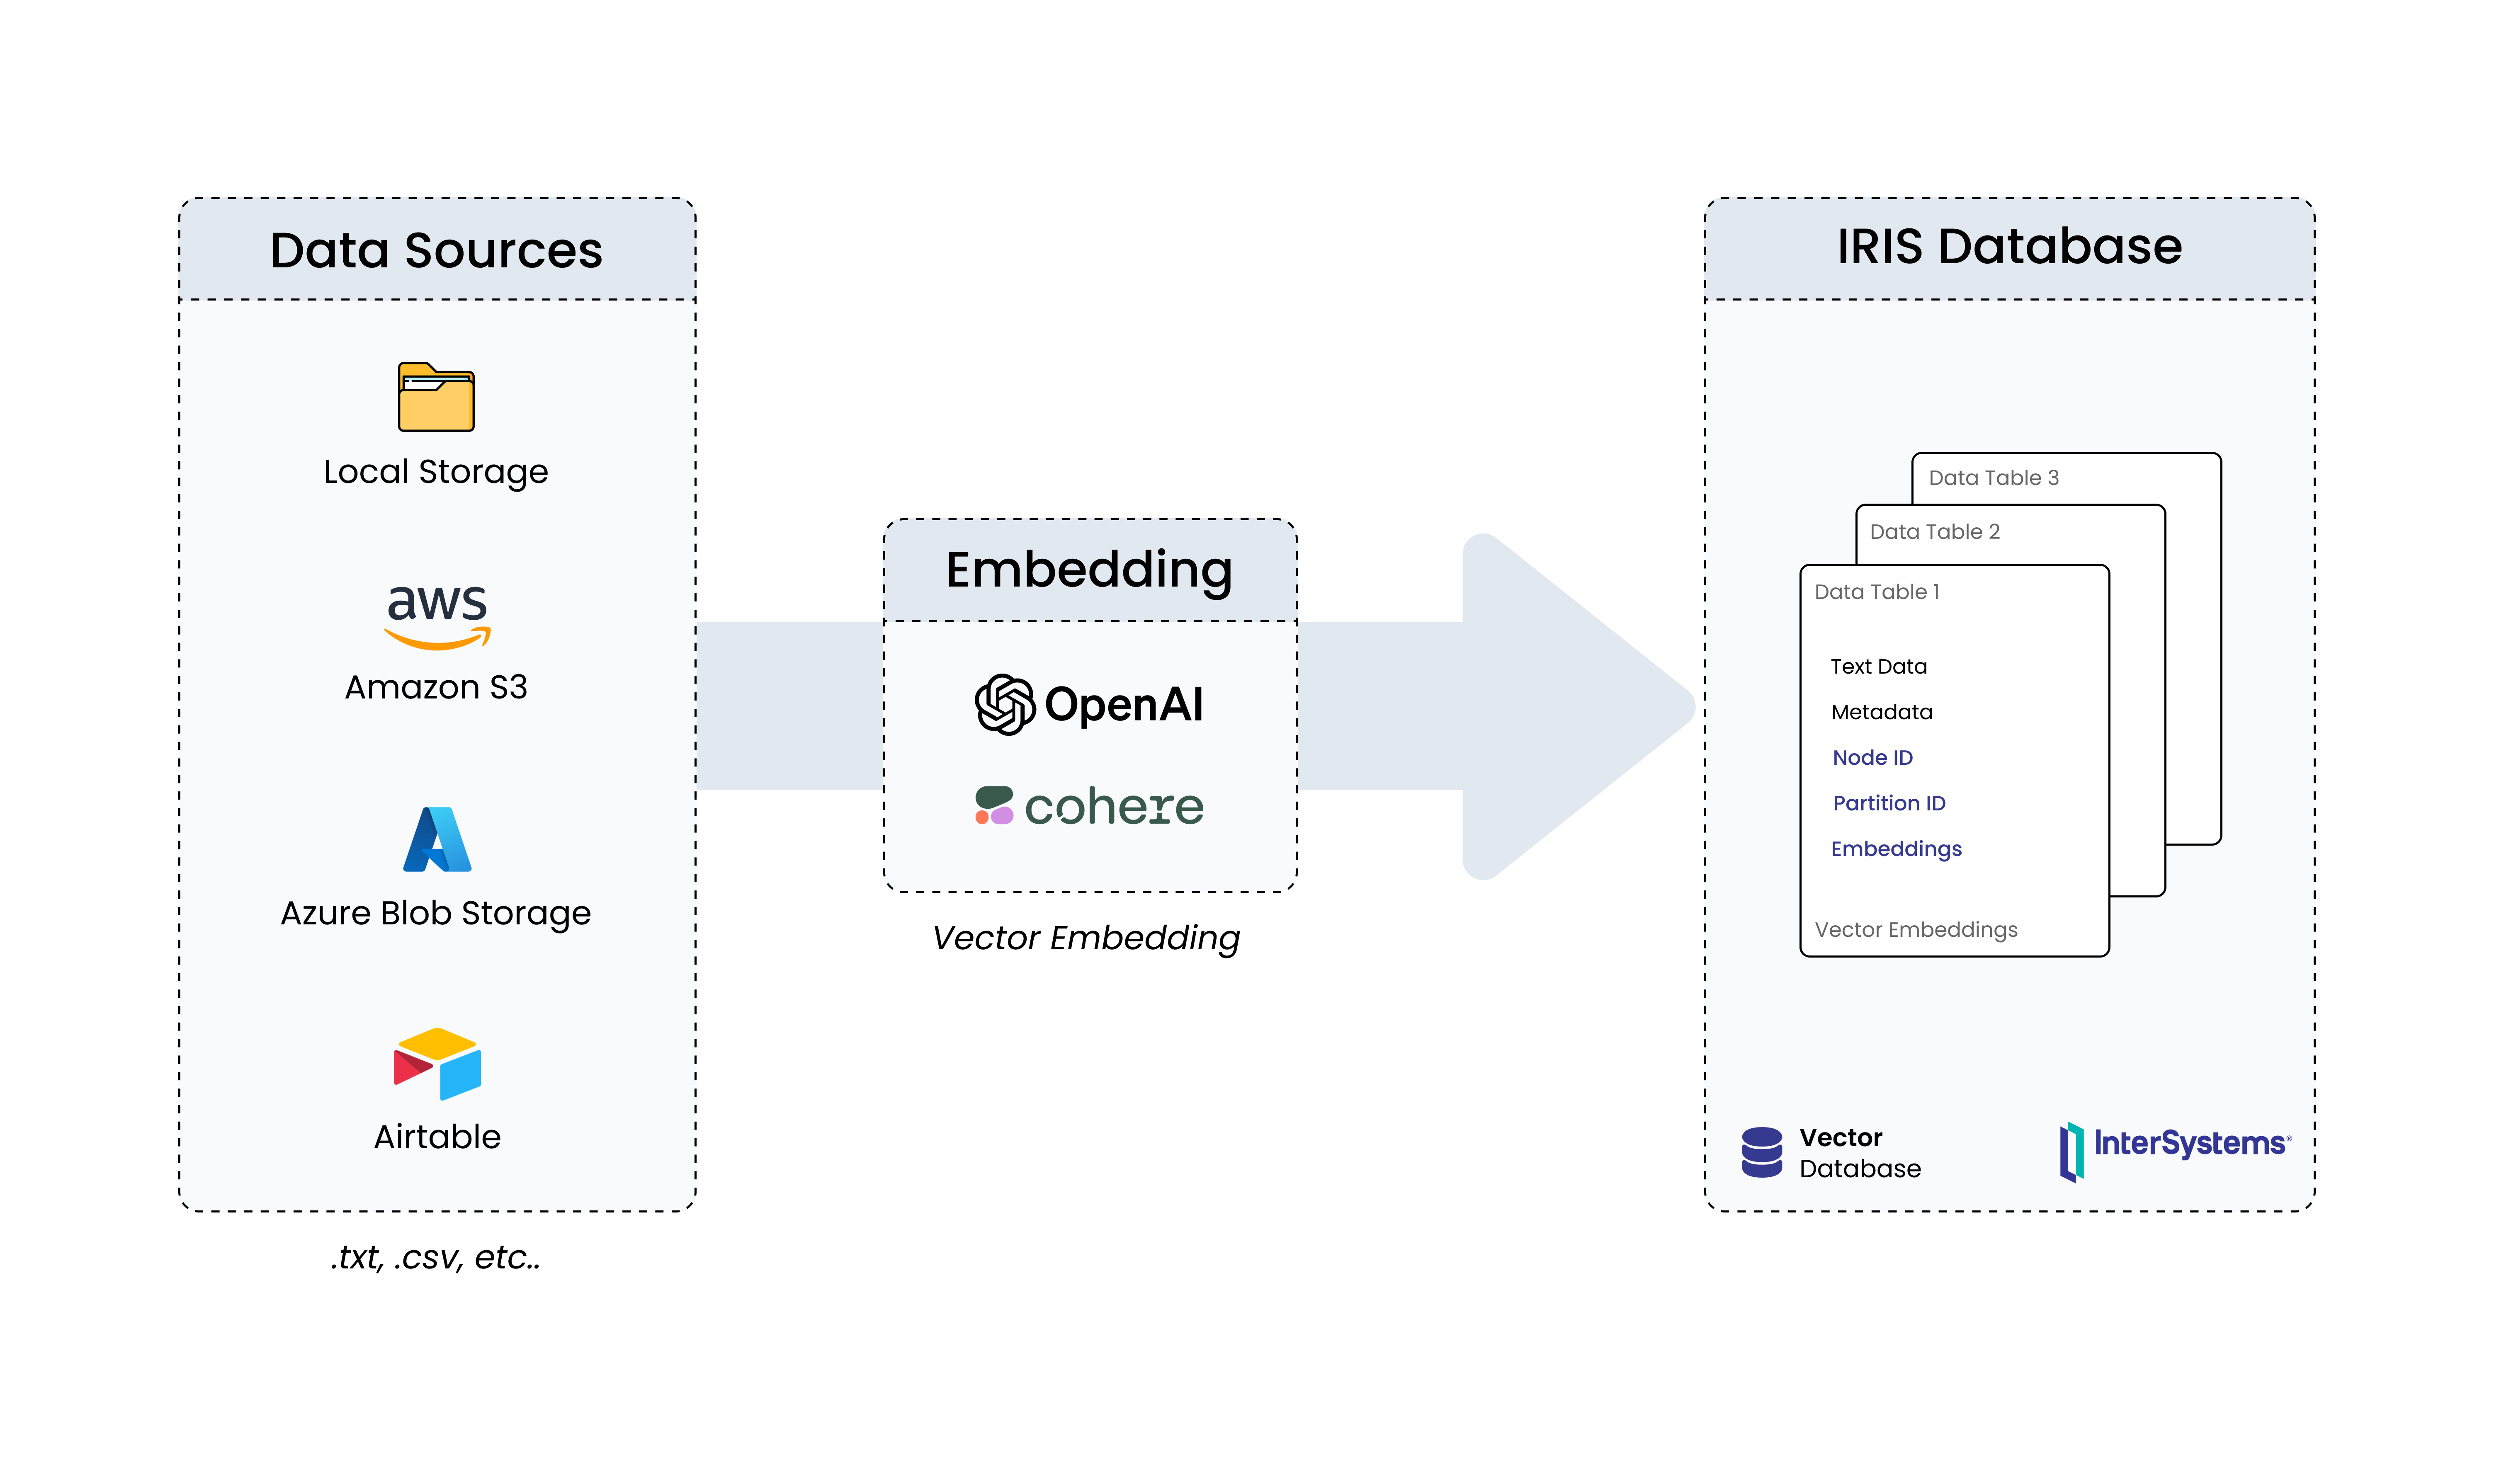
DNA Similarity and Classification was developed as a REST API utilizing InterSystems Vector Search technology to investigate genetic similarities and efficiently classify DNA sequences. This is an application that utilizes artificial intelligence techniques, such as machine learning, enhanced by vector search capabilities, to classify genetic families and identify known similar DNAs from an unknown input DNA.

K-mer Analysis: Fundamentals in DNA Sequence Analysis

Fragmentation of a DNA sequence into k-mers is a fundamental technique in genetic data processing. This approach involves breaking down the DNA sequence into smaller subsequences of fixed size, known as k-mers. For example, if we take the sequence "ATCGTAGCTA" and define k as 3, we would obtain the following k-mers: "ATC", "TCG", "CGT", "GTA", "TAG", "AGC", "GCT", and "CTA".

This process is carried out by sliding a window of size k along the sequence, extracting each subsequence of size k, and recording it as a k-mer. The window then moves to the next set of bases, allowing overlap between the k-mers. This overlap is crucial to ensure that no information is lost during the fragmentation process.

The resulting k-mers retain crucial local information about the structure of the DNA sequence. This is critical because many biologically relevant pieces of information are contained within specific regions of DNA. Subsequent analysis of these k-mers can reveal patterns, identify conserved or similar regions between different DNA sequences, and assist in the investigation of genetic functions and interactions.

In summary, DNA Similarity and Classification offer an approach to identify genetic similarities and classify DNA sequences.

Application

The following code initializes the project, performing the necessary setup before building:

ClassMethod init()
{
    write "START INIT"
    Do ##class(dc.data.DNAClassification).CreateTheModelML()
    Do ##class(dc.data.HumanDNA).UploadData()
}

The UploadData method implemented in the code is responsible for fragmenting DNA sequences into k-mers, converting these k-mers into vectors using a specific encoding model, and then storing these vectors in the database.

print("Reading dataset")
human_df = pd.read_table('/opt/irisbuild/data/human_data.txt')
human_df = human_df.sample(n=1500, random_state=42)

To enhance performance and reduce processing time during the project's build phase, a sampling process is implemented, limiting the read to the first 1,500 records of the file. While this strategy speeds up the process, it's worth noting that a comprehensive analysis of the file could provide a more thorough understanding of the data. However, due to the commitment to efficiency and the pace of construction, this approach was adopted.

def getKmers(sequence, size=6, max_length=5000):
    kmers = [sequence[x:x+size].lower() for x in range(len(sequence) - size + 1)]
    kmers = [kmer for kmer in kmers if len(kmer) > 0]
    if len(kmers) == 0:
        return [sequence]
    return kmers[:max_length]

The MAX_LEN parameter in getKmers is used to limit the maximum size of the k-mers processed to optimize the runtime of the process. However, it's important to note that this approach may not be ideal in terms of fully representing the DNA data.

 print("Creating K-mers groups")
    human_df['K_mers'] = human_df['sequence'].apply(getKmers)

    print("Combining K-mers into strings")
    human_df['K_mers_str'] = human_df['K_mers'].apply(lambda x: ' '.join(x))

    print("Download stsb-roberta-base-v2 model")
    model = SentenceTransformer('stsb-roberta-base-v2')

    print("Encode K_mers")
    embeddings = model.encode(human_df['K_mers_str'].tolist(), normalize_embeddings=True)

    print("Creating column sequence_vectorized")
    human_df['sequence_vectorized'] = embeddings.tolist()

The code vectorizes DNA sequences using the encoding model stsb-roberta-base-v2 from the SentenceTransformer library. This step converts DNA sequences into numerical vectors, facilitating their vector manipulation and computational analysis. After vectorization, the data is stored in the database for future use. This step is crucial to ensure that DNA sequence vectors are available for queries and additional analyses.

Subsequently, the method findSimilarity is responsible for finding the most similar DNA sequences based on a received DNA sequence input. It fragments the DNA sequence into k-mers and queries the database to find the five closest DNA sequences.

ClassMethod findSimilarity(pSequence As %String) As %String [ Language = python ]
{
    import iris
    from sentence_transformers import SentenceTransformer

    results = []

    def getKmers(sequence, size=6, max_length=5000):
        kmers = [sequence[x:x+size].lower() for x in range(len(sequence) - size + 1)]
        kmers = [kmer for kmer in kmers if len(kmer) > 0]
        if len(kmers) == 0:
            return [sequence]
        return kmers[:max_length]
        

    model = SentenceTransformer('stsb-roberta-base-v2') 
    kmers = getKmers(pSequence)
    kmers_str = ' '.join(kmers)
    search_vector = model.encode(kmers_str, normalize_embeddings=True).tolist()

    stmt = iris.sql.prepare("SELECT TOP 5 ID FROM dc_data.HumanDNA ORDER BY VECTOR_DOT_PRODUCT(kMersVector, TO_VECTOR(?)) DESC ")
    rs = stmt.execute(str(search_vector))

    class_mapping = {
            0: 'G protein coupled receptors',
            1: 'tyrosine kinase',
            2: 'tyrosine phosphatase',
            3: 'synthetase',
            4: 'synthase',
            5: 'lon channel',
            6: 'transcription factor',
    }

    for idx, row in enumerate(rs):
        humanDNA = iris.cls("dc.data.HumanDNA")._OpenId(row[0])    

        results.append({
            "sequence": humanDNA.sequence,
            "dnaClass": class_mapping[humanDNA.dnaClass]
        })
    return results
}

These processes are essential for the project as they enable the comparative analysis of DNA sequences and the identification of patterns or similarities among them.

Applied Machine Learning

Machine learning has been utilized to perform DNA sequence classification. The DNAClassification class contains methods for training a multinomial Naive Bayes classification model and for classifying DNA sequences based on this model.

The CreateTheModelML method is responsible for training the classification model. Firstly, DNA sequences are preprocessed, transformed into k-mers, and grouped. Then, these k-mer groups are converted into a numerical representation using vectorization technique. The multinomial Naive Bayes model is then trained with these vectorized data. After training, the model's performance is evaluated through analyses such as precision, recall, and F1 score.

ClassMethod CreateTheModelML()
{
    import pandas as pd

    def getKmers(sequence, size=6):
        kmers = [sequence[x:x+size].lower() for x in range(len(sequence) - size + 1)]
        kmers = [kmer for kmer in kmers if len(kmer) > 0]
        if len(kmers) == 0:
            return [sequence]
        return kmers

    print("Reading dataset")
    human_df = pd.read_table('/opt/irisbuild/data/human_data.txt')

    print("Creating K-mers groups")
    human_df['K_mers'] = human_df['sequence'].apply(getKmers)
    
    human_df['words'] = human_df.apply(lambda x: getKmers(x['sequence']), axis=1)
    human_df = human_df.drop('sequence', axis=1)

    human_texts = list(human_df['words'])
    for item in range(len(human_texts)):
        human_texts[item] = ' '.join(human_texts[item])
    y_data = human_df.iloc[:, 0].values        
    
    from sklearn.feature_extraction.text import CountVectorizer
    cv = CountVectorizer(ngram_range=(4,4))
    X_human_dna = cv.fit_transform(human_texts)

    print(X_human_dna.shape)

    print("PREPARING FIT DATA")
    from sklearn.model_selection import train_test_split
    X_train, X_test, y_train, y_test = train_test_split(X_human_dna, 
                                                        y_data, 
                                                        test_size = 0.20, 
                                                        random_state=42)
    
    print("FIT THE MODEL")
    from sklearn.naive_bayes import MultinomialNB
    classifier = MultinomialNB(alpha=0.1)
    classifier.fit(X_train, y_train)

    y_pred = classifier.predict(X_test)

    print("VALIDATING THE MODEL")

    from sklearn.metrics import accuracy_score, f1_score, precision_score, recall_score
    print("Confusion matrix\n")
    print(pd.crosstab(pd.Series(y_test, name='Actual'), pd.Series(y_pred, name='Predicted')))
    def get_metrics(y_test, y_predicted):
        accuracy = accuracy_score(y_test, y_predicted)
        precision = precision_score(y_test, y_predicted, average='weighted')
        recall = recall_score(y_test, y_predicted, average='weighted')
        f1 = f1_score(y_test, y_predicted, average='weighted')
        return accuracy, precision, recall, f1
    accuracy, precision, recall, f1 = get_metrics(y_test, y_pred)
    print("accuracy = %.3f \nprecision = %.3f \nrecall = %.3f \nf1 = %.3f" % (accuracy, precision, recall, f1))


    print("SAVE THE MODEL")
    import joblib
    joblib.dump(classifier, '/opt/irisbuild/data/multinomial_nb_model.pkl')
    joblib.dump(cv, '/opt/irisbuild/data/cv_to_multinomial_nb_model.pkl')
}

On the other hand, the ClassifyDnaSequence method is responsible for classifying the received DNA sequences as input. Firstly, the sequence is preprocessed and transformed into k-mers. Then, these k-mers are vectorized using the same process used during the model training. The trained model is then loaded and used to predict the class of the DNA sequence. The classification result includes the predicted class and the probabilities associated with each class.

ClassMethod ClassifyDnaSequence(sequence As %String) As %Status
{
    import joblib
    from sklearn.feature_extraction.text import CountVectorizer

    classifier = joblib.load('/opt/irisbuild/data/multinomial_nb_model.pkl')
    cv = joblib.load('/opt/irisbuild/data/cv_to_multinomial_nb_model.pkl')

    def getKmers(sequence, size=6):
        kmers = [sequence[x:x+size].lower() for x in range(len(sequence) - size + 1)]
        kmers = [kmer for kmer in kmers if len(kmer) > 0]
        if len(kmers) == 0:
            return [sequence]
        return kmers
    k_mers = getKmers(sequence)

    k_mers_vec = cv.transform([' '.join(k_mers)])

    predicted_class = classifier.predict(k_mers_vec)[0]
    probabilities = classifier.predict_proba(k_mers_vec)[0]

    class_mapping = {
            0: 'G protein coupled receptors',
            1: 'tyrosine kinase',
            2: 'tyrosine phosphatase',
            3: 'synthetase',
            4: 'synthase',
            5: 'lon channel',
            6: 'transcription factor',
    }
    

    result = {
        "Classification": class_mapping[predicted_class],
        "Probabilities": {
            class_mapping[class_index]: float(probability)
            for class_index, probability in enumerate(probabilities)
        }
    }
    
    return result
}

Usage of the Application

Users interact with the system by sending DNA sequences through queries and can request a JSON-formatted response containing information about the discovered similar sequences and their classifications, simplifying the process of genetic analysis.

Below is the API to be used: http://localhost:52773/api/dna/find?&dna=<YOUR_DNA>

  • dna: Enter the DNA sequence you want to search

Example: http://localhost:52773/api/dna/find?&dna=ATGAACTGTCCAGCCCCTGTGGAGATCTCCT...

Using Postman to visualize the API response (can be done using a browser or other applications like Insomnia):

Project: GitHub

Voting: DNA-similarity-and-classify

2 Comments
Discussion (2)2
Connectez-vous ou inscrivez-vous pour continuer
Question
· Mai 15, 2024

Modification d'un objet dynamique provenant d'un JSON

Bonjour, 

Je souhaite réaliser une méthode générique pour modifier des propriétés d'une classe dynamique. Lorsque je fais un JSONImport() cela fonctionne très bien pour certains objet, or dans le cas d'un objet contenant une liste cela m'ajoute un élément en plus au lieu de la modifier. J'ai essayée de vérifier le type lors de l'itération du JSON afin de faire un Insert mais je n'arrive pas à utiliser les $METHOD sur le Insert ou même le %Set. 

Voici la classe : 

Class Epc.conf.poste Extends (%Persistent, %JSON.Adaptor)
{

Property NomPoste As %String(%JSONFIELDNAME = "NomPoste", MAXLEN = "");
Property tPrinter As list Of EpErp.conf.printer(%JSONFIELDNAME = "tPrinter", SQLPROJECTION = "table/column", STORAGEDEFAULT = "array");
}
Class EpErp.conf.printer Extends (%SerialObject, %JSON.Adaptor)
{

Property Service As %String(%JSONFIELDNAME = "NomService", MAXLEN = "");
Property Print As %String(%JSONFIELDNAME = "NomImprimante", MAXLEN = "");
}

Mes données actuelles : 

Le fichier que j'envoie afin de modifier ma liste, je souhaite donc modifier un des éléments de ma list  : 

{
	"NomPoste":"Poste",
	"tPrinter":
	[
		{
			"NomService":"Petite",
			"NomImprimante":"EPFR_12"
		},
		{
			"NomService":"Grande",
			"NomImprimante":"Modif"
		}
	]
}

Ma méthode de modification générique : 

ClassMethod update(){
    
set payload={}.%FromJSON(%request.Content)

 set itr           = payload.%GetIterator()  

 if ##class(%Dictionary.ClassDefinition).%ExistsId(className){
  set class = $CLASSMETHOD(className,"%OpenId",id)
   if $ISOBJECT(class){
       if payload '= ""{
          while itr.%GetNext(.prop,.val) {
              if prop.%IsA("%DynamicArray"){
                    ?                 
                }else{
                    Set $PROPERTY(class, prop) = val
                }
               
                  do class.%Save()
                 }
             }
        }
     }
}

Merci par avance pour votre aide. 

2 Comments
Discussion (2)2
Connectez-vous ou inscrivez-vous pour continuer
Article
· Mai 15, 2024 6m de lecture

IRIS AI Studio: Connectors to Transform your Files into Vector Embeddings for GenAI Capabilities

In the previous article, we saw different modules in IRIS AI Studio and how it could help explore GenAI capabilities out of IRIS DB seamlessly, even for a non-technical stakeholder. In this article, we will deep dive into "Connectors" module, the one that enables users to seamlessly load data from local or cloud sources (AWS S3, Airtable, Azure Blob) into IRIS DB as vector embeddings, by also configuring embedding settings like model and dimensions. 


New Updates  ⛴️ 

  • Online Demo of the application is now available at https://iris-ai-studio.vercel.app
  • Connectors module can now load data from (OpenAI/Cohere embeddings)
    • Local Storage
    • AWS S3
    • Azure Blob Storage
    • Airtable
  • Playground module is fully functional with
    • Semantic Search
    • Chat with Docs
    • Recommendation Engine
      • Cohere Re-rank
      • OpenAI Re-rank
    • Similarity Engine


Connectors

If you have used ChatGPT 4 or other LLM services where they get the context and run the intelligence on top of that context, that ideally adds business value over a generic LLM. Simply the intelligence on your data. This module out of box gives a no-code interface to load data from different sources, do embeddings on it and load it to IRIS DB. This connectors module mainly go through 3 steps

  1. Fetching data from different sources
  2. Getting the data embedded using OpenAI/Cohere embedding models
  3. Loading the embeddings and text into IRIS DB


Step 1: Fetching data from different source

1. Local Storage - Upload files. I have used Llama Index's SimpleDirectoryReader to load data from files. 

(a limitation of up to 10 files in one go is put to handle the load on tiny server that I used for demo purpose. Can be negated on your own implementation)

# Check for uploaded files
if "files" not in request.files:
  return jsonify({"error": "No files uploaded"}), 400
uploaded_files = request.files.getlist("files")
if len(uploaded_files) > 10:
  return jsonify({"error": "Exceeded maximum file limit (10)"}), 400
temp_paths = []
for uploaded_file in uploaded_files:
  fd, temp_path = tempfile.mkstemp()
  with os.fdopen(fd, "wb") as temp:
    uploaded_file.save(temp)
  temp_paths.append(temp_path)

# Load data from files
documents = SimpleDirectoryReader(input_files=temp_paths).load_data()


 2. AWS S3

Input Parameters: Client ID, Client Secret and Bucket Name. You may get the client id and secret from the AWS console - IAM or creating read permissions for your bucket over there.

I have used "s3fs" library to fetch the contents from AWS S3 and Llama Index's SimpleDirectoryReader to load data from the fetched files.

access_key = request.form.get('aws_access_key')
secret = request.form.get('aws_secret')
bucket_name = request.form.get('aws_bucket_name')

if not all([access_key, secret, bucket_name]):
    return jsonify({"error": "Missing required AWS S3 parameters"}), 400
s3_fs = S3FileSystem(key=access_key, secret=secret)
reader = SimpleDirectoryReader(input_dir=bucket_name, fs=s3_fs, recursive=True)
documents = reader.load_data()


3. Airtable

Input Parameters: Token (API Key), Base ID and Table ID. API Key can be retrieved from the Airtable's Developer Hub. Base ID and Table ID can be found from the table's URL. The one that starts with "app.." is the base ID and "tbl.." is the Table ID

I have used Airtable Reader from LlamaHub to fetch the contents from Airtable and Llama Index's SimpleDirectoryReader to load data from the fetched files.

airtable_token = request.form.get('airtable_token')
table_id = request.form.get('table_id')
base_id = request.form.get('base_id')

if not all([airtable_token, table_id, base_id]):
        return jsonify({"error": "Missing required Airtable parameters"}), 400
reader = AirtableReader(airtable_token)
documents = reader.load_data(table_id=table_id, base_id=base_id)


4. Azure Blob Storage: 

Input Parameters: Container name and Connection string. These information can be retrieved from Azure's AD page. 

I have used AzStorageBlob Reader from LlamaHub to fetch the contents from Azure Storage and Llama Index's SimpleDirectoryReader to load data from the fetched files.

container_name = request.form.get('container_name')
connection_string = request.form.get('connection_string')

if not all([container_name, connection_string]):
    return jsonify({"error": "Missing required Azure Blob Storage parameters"}), 400
loader = AzStorageBlobReader(
    container_name=container_name,
    connection_string=connection_string,
)
documents = loader.load_data()

LlamaHub does contain 500+ connectors ranging from different file types to services. Adding a new connector based on your needs should be pretty straight forward. 


Step 2: Getting the data embedded using OpenAI/Cohere embedding models

Embeddings are numerical representations that capture the semantics of text, enabling applications like search and similarity matching. Ideally the objective is, when an user asks a question, its embedding is compared to document embeddings using methods like cosine similarity – higher similarity indicates more relevant content. 

Here, I'm using llama-iris library to store embeddings into IRIS DB. In the IRISVectorStore params

  • Connection String is needed for interaction with DB
    • For trying out in the online demo version, you may not use a locally running instance (localhost).
    • You would need an IRIS instance that runs on AWS/Azure/GCP with 2024.1+ version, since those support vector storage and retrieval.
    • The IRIS Community instance provided by the learning hub seems to be running with 2022.1 version, in which case that cannot be used for exploration purpose.
  • Table Name is the one that will be used to create or update records into
    • The library "llama-iris" appends "data_" to the table name. So, when you are trying to check the data through DB client, append "data_" to the table name. Say, you've named table as "users", you would need to retrieve as "data_users"
  • Embed Dim / Embedding Dimension is the dimension of the Embedding model that the user used
    • Say you've loaded "users" table by using OpenAI embeddings - "text-embedding-3-small" with 1536 dimension. You would be able to load more data into the table, but only with 1536 dimension. Same goes with vector embedding retrievals as well. So, make sure to choose the right model in the initial phases.
CONNECTION_STRING = f"iris://{username}:{password}@{hostname}:{port}/{namespace}"
vector_store = IRISVectorStore.from_params(
    connection_string=CONNECTION_STRING,
    table_name=table_name,
    embed_dim=embedding_dimension
)

Settings.embed_model = set_embedding_model(indexing_type, model_name, api_key)

storage_context = StorageContext.from_defaults(vector_store=vector_store)
index = VectorStoreIndex.from_documents(
    documents,
    storage_context=storage_context
)


Step 3: Loading the embedding and text into IRIS DB

The above written code covers the indexing and loading of data into IRIS DB. Here is how the data would look like - 

Text - Raw text information that's been extracted from the files we loaded

Node ID - This would be used as a reference when we do retrievals 

Embeddings - The actual numerical representations of the text data


These three steps are through which the connectors module mainly work. When it comes to required data, like DB credentials and API Keys - I get it from the user and save it to the browser's local storage (Instance Details) and session storage (API Keys). It gives more modularity to the application for anyone to explore.


By bringing together the loading of vector-embedded data from files and the retrieval of content through various channels, IRIS AI Studio enables an intuitive way to explore the Generative AI possibilities that InterSystems IRIS offers - not only for existing customers, but also for new prospects. 

🚀 Vote for this application in Vector Search, GenAI and ML contest, if you find it promising!

If you can think of any potential applications using this implementation, please feel free to share them in the discussion thread.

2 Comments
Discussion (2)0
Connectez-vous ou inscrivez-vous pour continuer
Article
· Mai 15, 2024 2m de lecture

Retrieve images using vector search (2)

You need to install the application first. If not installed, please refer to the previous article

Application demonstration

After successfully running the iris image vector search application, some data needs to be stored to support image retrieval as it is not initialized in the library.

Image storage

Firstly, drag and drop the image or click the upload icon, select the image, and click the upload button to upload and vectorize it. This process may be a bit slow.

This process involves using embedded Python to call the CLIP model and vectorize the image into 512 dimensional vector data.

ClassMethod LoadClip(imagePath) As %String [ Language = python ]
{
import torch
import clip
from PIL import Image

device = "cuda" if torch.cuda.is_available() else "cpu"
model, preprocess = clip.load("ViT-B/32", device=device)

image = preprocess(Image.open(imagePath)).unsqueeze(0).to(device)

with torch.no_grad():
    image_features = model.encode_image(image)
return str(image_features[0].tolist())
}

View vector data

Viewing Vector Data in the Management Portal

Vector query

The image vector query process uses VECTOR_COSINE to retrieve the similarity of vector data, which can be achieved through the following SQL.

select top ? id Image,VECTOR_COSINE(TO_VECTOR(ImageVector,double),(select TO_VECTOR(ImageVector,double) from VectorSearch_DB.ImageDB where id= ? )) Similarity from VectorSearch_DB.ImageDB order by Similarity desc


After uploading multiple images, select query and the image with the highest similarity to the left will be displayed on the right. Click next to view the next page. The similarity between the two images will gradually decrease with each click.


This application is a demo of image vector retrieval. If you are interested, you can check Open Exchange or visit Github to see more information.

3 Comments
Discussion (3)2
Connectez-vous ou inscrivez-vous pour continuer