Rechercher

Article
· Juil 23, 2024 4m de lecture

リンクテーブルと外部テーブルについて

これは InterSystems FAQ サイトの記事です。
 

JDBC および ODBC 経由でInterSystemsIRISから外部データベースにアクセスしたい場合、SQLゲートウェイを使用しリンクテーブルを作成して接続できます。

2023.1以降のバージョンでは、リンクテーブルに加えて、外部テーブル/FOREIGN TABLE を使用することが可能となりました(2024.1時点で実験的機能)。

外部テーブルというのは、物理的に別の場所に保存されているデータを IRIS SQL に投影する非常に便利な機能です。

外部テーブルを使用する場合は、Java(2023.1の場合は1.8~)を事前にインストールし、JAVA_HOME環境変数を設定するだけで、簡単に接続することが可能です。

※JAVA_HOME環境変数設定例:


外部テーブルの使用方法については、以下の記事で紹介しております。
レシピデータセットを外部テーブルで読み込み、組み込みPythonでLLMを使って分析する (Langchain + OpenAI)


こちらの記事では、外部テーブルで作成できる2種類のテーブル(「CSVファイル直接接続」と「外部DBへのJDBCゲートウェイ経由での接続」)の簡単なサンプル作成例と、外部テーブルの特徴を紹介しています。
 

1-1. 簡単なサンプル作成例(CSVファイル編:ファイルから外部テーブル作成)


a. 外部データラッパとする CSVファイルを用意します(例:C:\temp\FT\managers.csv)

 ※サンプルCSV(managers.csv)

ID,Name,Title,HireDate,CompanyCar
111,"Cornish,Irving",Senior Support Manager,1992-02-10,6
222,"Aquino,Aric","Manager, Technical Account Management",1992-07-15,3
333,"Masterson,Arthur","Director, Customer Support",2002-10-01,9
444,"Deyn,Ernest",Director Customer Support,2000-08-15,4
555,"Lee,Eileen","Manager, Product Support",2002-06-17,3
666,"Knapp,Ashtyn",Senior Support Manager,2002-10-01,11
777,"King,Michael",Senior Support Manager,2003-04-10,2


b. 外部サーバ(WRC.Files)を作成します

CREATE FOREIGN SERVER WRC.Files FOREIGN DATA WRAPPER CSV HOST 'C:\temp\FT\'


c. 外部テーブルを作成します

CREATE FOREIGN TABLE WRC.Managers (
  ID INTEGER, 
  Name VARCHAR, 
  Title VARCHAR, 
  HireDate DATE
) SERVER WRC.Files FILE 'managers.csv' USING
{ "from" : {
       "file" : {
          "header": 1
       }
   }
}


1-2. 簡単なサンプル作成例(JDBCゲートウェイ接続経由編)


a. 外部DBへの JDBCゲートウェイ接続を作成します
 管理ポータル:
 [システム管理] > [構成] > [接続性] > [SQLゲートウェイ接続] 新規作成:WRC


b. 接続用の外部サービス(例:WRC.Data)を作成します。  

CREATE FOREIGN SERVER WRC.Data FOREIGN DATA WRAPPER JDBC CONNECTION 'WRC'


c. 外部サーバ内の任意のテーブルに対して外部テーブルを作成します。
  ※外部テーブルは CREATE FOREIGN TABLE コマンドで定義する必要があります。
   クラス定義を作成して外部テーブルを作成することはできません。

CREATE FOREIGN TABLE Remote.Problems SERVER WRC.Data TABLE 'SQLUser.Problem'


d. 作成後、クエリを実行します。

SELECT ProblemOwner, OpenDate FROM Remote.Problems WHERE OpenDate = '2023-03-09'

外部言語サーバ(%Java Server)が起動されていない状態でクエリを実行すると、以下のようなエラーが返ります。

SQLCODE: <-230>:<Foreign table query Execute() failed>]
  [%msg: <Foreign Tables - ERROR #5023: Remote Gateway Error: Connection cannot be established>]


2. 外部テーブルの特徴

・外部テーブルとのJoinが可能

・ローカルテーブルとのJoinが可能

・外部テーブル用に作成されるクラスは非表示となる(SQLテーブルとしては表示可能)

・削除する場合は、DROP FOREIGN TABLE コマンドで行う(%MANAGE_FOREIGN_SERVER 管理特権が必要)
 例:DROP FOREIGN TABLE WRC.Advisor

・外部テーブルに対してクエリを実行すると、クエリごとにすべてのフィールドが取得される

・ストリーム(Stream)フィールドの取得方法は、リンクテーブルと同様に substring 関数 を使用可能

例:

select substring(clob1,1,50) from linked.newclass1


※うまく動作しない場合は、%Java Server が問題なく起動できているかご確認ください。
 [システム管理] > [構成] > [接続性] >[外部言語サーバ]  
 %Java Server が Start されているか


外部テーブルの詳細については、以下のドキュメントをご覧ください。
外部テーブル


※SQLゲートウェイ/リンクテーブルの使用方法については、以下のような記事をご紹介しております。

(管理ポータルで行う)リンクテーブルをプログラムで行う方法
SQL ゲートウェイを使用した外部データベースへのアクセス方法について
プログラムでSQLゲートウェイ接続設定を作成する方法

Discussion (0)0
Connectez-vous ou inscrivez-vous pour continuer
Question
· Juil 23, 2024

IRIS - basic navigation question

So, here is a novice question; but, I can't seem to figure out how to do it, or find any comments. I simply want to close out this DTL, under the Interoperability / Build / DTL screen:

There do not seem to be any buttons to 'close' the current DTL item. I tried logging off and back on, and, it brings it right back. Ideas?

4 Comments
Discussion (4)3
Connectez-vous ou inscrivez-vous pour continuer
Article
· Juil 23, 2024 4m de lecture

Databricks Station - InterSystems Cloud SQL


A Quick Start to InterSystems Cloud SQL Data in Databricks

Up and Running in Databricks against an InterSystmes Cloud SQL consists of four parts.

  • Obtaining Certificate and JDBC Driver for InterSystems IRIS
  • Adding an init script and external library to your Databricks Compute Cluster
  • Getting Data
  • Putting Data


Download X.509 Certificate/JDBC Driver from Cloud SQL

Navigate to the overview page of your deployment, if you do not have external connections enabled, do so and download your certificate and the jdbc driver from the overview page.


I have used intersystems-jdbc-3.8.4.jar and intersystems-jdbc-3.7.1.jar with success in Databricks from Driver Distribution.

Init Script for your Databricks Cluster

Easiest way to import one or more custom CA certificates to your Databricks Cluster, you can create an init script that adds the entire CA certificate chain to both the Linux SSL and Java default cert stores, and sets the REQUESTS_CA_BUNDLE property. Paste the contents of your downloaded X.509 certificate in the top block of the following script:

import_cloudsql_certficiate.sh
#!/bin/bash

cat << 'EOF' > /usr/local/share/ca-certificates/cloudsql.crt
-----BEGIN CERTIFICATE-----
<PASTE>
-----END CERTIFICATE-----
EOF

update-ca-certificates

PEM_FILE="/etc/ssl/certs/cloudsql.pem"
PASSWORD="changeit"
JAVA_HOME=$(readlink -f /usr/bin/java | sed "s:bin/java::")
KEYSTORE="$JAVA_HOME/lib/security/cacerts"
CERTS=$(grep 'END CERTIFICATE' $PEM_FILE| wc -l)

# To process multiple certs with keytool, you need to extract
# each one from the PEM file and import it into the Java KeyStore.
for N in $(seq 0 $(($CERTS - 1))); do
  ALIAS="$(basename $PEM_FILE)-$N"
  echo "Adding to keystore with alias:$ALIAS"
  cat $PEM_FILE |
    awk "n==$N { print }; /END CERTIFICATE/ { n++ }" |
    keytool -noprompt -import -trustcacerts \
            -alias $ALIAS -keystore $KEYSTORE -storepass $PASSWORD
done
echo "export REQUESTS_CA_BUNDLE=/etc/ssl/certs/ca-certificates.crt" >> /databricks/spark/conf/spark-env.sh
echo "export SSL_CERT_FILE=/etc/ssl/certs/ca-certificates.crt" >> /databricks/spark/conf/spark-env.sh

Now that you have the init script, upload the script to Unity Catalog to a Volume.

Once the script is on a volume, you can add the init script to the cluster from the volume in the Advanced Properties of your cluster.


Secondly, add the intersystems jdbc driver/library to the cluster...

...and either start or restart your compute.

Databricks Station - Inbound InterSystems IRIS Cloud SQL


Create a Python Notebook in your workspace, attach it to your cluster and test dragging data inbound to Databricks.  Under the hood, Databricks is going to be using pySpark, if that is not immediately obvious.

The following spark dataframe construction is all you should need, you can grab your connection info from the overview page as before.

df = (spark.read
  .format("jdbc")
  .option("url", "jdbc:IRIS://k8s-05868f04-a4909631-ac5e3e28ef-6d9f5cd5b3f7f100.elb.us-east-1.amazonaws.com:443/USER")
  .option("driver", "com.intersystems.jdbc.IRISDriver")
  .option("dbtable", "(SELECT name,category,review_point FROM SQLUser.scotch_reviews) AS temp_table;") 
  .option("user", "SQLAdmin")
  .option("password", "REDACTED")
  .option("driver", "com.intersystems.jdbc.IRISDriver")\
  .option("connection security level","10")\
  .option("sslConnection","true")\
  .load())

df.show()

Illustrating the dataframe output from data in Cloud SQL... boom!

Databricks Station - Outbound InterSystems IRIS Cloud SQL


Lets now take what we read from IRIS and write it write back with Databricks. If you recall we read only 3 fields into our dataframe, so lets write that back immediately and specify an "overwrite" mode.

df = (spark.read
  .format("jdbc")
  .option("url", "jdbc:IRIS://k8s-05868f04-a4909631-ac5e3e28ef-6d9f5cd5b3f7f100.elb.us-east-1.amazonaws.com:443/USER")
  .option("driver", "com.intersystems.jdbc.IRISDriver")
  .option("dbtable", "(SELECT TOP 3 name,category,review_point FROM SQLUser.scotch_reviews) AS temp_table;") 
  .option("user", "SQLAdmin")
  .option("password", "REDACTED")
  .option("driver", "com.intersystems.jdbc.IRISDriver")\
  .option("connection security level","10")\
  .option("sslConnection","true")\
  .load())

df.show()

mode = "overwrite"
properties = {
    "user": "SQLAdmin",
    "password": "REDACTED",
    "driver": "com.intersystems.jdbc.IRISDriver",
    "sslConnection": "true",
    "connection security level": "10",
}

df.write.jdbc(url="jdbc:IRIS://k8s-05868f04-a4909631-ac5e3e28ef-6d9f5cd5b3f7f100.elb.us-east-1.amazonaws.com:443/USER", table="databricks_scotch_reviews", mode=mode, properties=properties)

Executing the Notebook

 
Illustrating the data in InterSystems Cloud SQL!

Things to Consider

  • By default, PySpark writes data using multiple concurrent tasks, which can result in partial writes if one of the tasks fails.
  • To ensure that the write operation is atomic and consistent, you can configure PySpark to write data using a single task (i.e., set the number of partitions to 1) or use a iris-specific feature like transactions.
  • Additionally, you can use PySpark’s DataFrame API to perform filtering and aggregation operations before reading the data from the database, which can reduce the amount of data that needs to be transferred over the network.
2 Comments
Discussion (2)2
Connectez-vous ou inscrivez-vous pour continuer
Question
· Juil 22, 2024

SQL Gateway getClob() errors in Redshift and Postgresql

I'm trying to use the EnsLib.SQL.Operation.GenericOperation component in a production to read a column from a Redshift table that is set up as VARCHAR(65535) and am getting the following error.  

An error was received : ERROR #5023: Remote Gateway Error: JDBC Gateway getClob(0,1) errorRemote JDBC error: Cannot convert the column of type VARCHAR to requested type long..

The query I'm using is a simple 'SELECT column_name FROM table_name'.  I've done a little research and it sounds like Redshift doesn't support getClob().  Is there anything I can do to force the gateway to not use getClob() on this Redshift column, or some other work around?  Casting the column in my select statement doesn't work... it seems the getClob() call is done under the hood by the gateway, and I would potentially need some way to override that?  

Thanks,

Don Martin, Sanford Health

5 Comments
Discussion (5)3
Connectez-vous ou inscrivez-vous pour continuer
Article
· Juil 16, 2024 9m de lecture

管理ポータルのウェブ・アプリケーションメニューの設定をプログラムで作成する方法

これは InterSystems FAQ サイトの記事です。

管理ポータル > [システム管理] > [セキュリティ] 以下の設定は、%SYSネームスペースにあるSecurityパッケージ以下クラスが提供するメソッドを利用することでプログラムから作成することができます。

以下シナリオに合わせたセキュリティ設定例をご紹介します。

シナリオ:RESTアプリケーション用設定を作成する

事前準備

シナリオの中で使用するソースを2種類インポートします。

アプリケーション用RESTディスパッチクラスをインポートします。

Class Test.REST Extends %CSP.REST
{

Parameter CHARSET = "utf-8";
Parameter CONTENTTYPE = "application/json";
Parameter CONVERTINPUTSTREAM = 1;
XData UrlMap [ XMLNamespace = "http://www.intersystems.com/urlmap" ]
{
<Routes>
<Route Url="/hello" Method="POST" Call="TestInsert" Cors="true" />
<Route Url="/hello" Method="DELETE" Call="TestDelete" Cors="true" />
</Routes>
}

/// Description
ClassMethod TestInsert() As %Status
{
    #dim %request As %CSP.Request
    #dim rset As %SQL.StatementResult
    set status = $$$OK
    Try {
        set bodyjson={}.%FromJSON(%request.Content)
        set ^Test=bodyjson.Message
        set stmt=##class(%SQL.Statement).%New()
        $$$ThrowOnError(stmt.%Prepare("insert into Test.Human (Name,Message) VALUES(?,?)"))
        set rset=stmt.%Execute($username,bodyjson.Message)
        if rset.%SQLCODE<0 {
            throw ##class(%Exception.SQL).CreateFromSQLCODE(rset.%SQLCODE,rset.%Message)
        }
        set j={}
        set j.Result="こんにちは!メッセージをUSERネームスペースのグローバル^TestとTest.Humanテーブルに格納しました。"
        do j.%ToJSON()     }
    Catch ex {
        Set status=ex.AsStatus()
    }
    Return status
}

ClassMethod TestDelete() As %Status
{
    #dim %request As %CSP.Request
    #dim rset As %SQL.StatementResult
    set status = $$$OK
    Try{
        kill ^Test
        set stmt=##class(%SQL.Statement).%New()
        $$$ThrowOnError(stmt.%Prepare("Delete from Test.Human"))
        set rset=stmt.%Execute()
        if rset.%SQLCODE<0 {
            throw ##class(%Exception.SQL).CreateFromSQLCODE(rset.%SQLCODE,rset.%Message)
        }
        set j={}
        set j.Result="USERネームスペースの^TestとTest.Humnaのデータを削除しました"
        do j.%ToJSON()
    }
    catch ex {
        Set status=ex.AsStatus()
    }
    Return status
}

}

続いて、Test.Humanテーブル用定義もインポートします。

Class Test.Human Extends %Persistent
{

Property Name As %String;
Property Message As %String;
}


それでは設定してみましょう。

1) RESTアプリケーション(/testApp)があり、USERネームスペースで動作するRESTアプリケーションに対して不特定多数のユーザが利用できるようにします=(認証なしアクセスを許可します)。

2) RESTアプリケーション利用時は、USERネームスペースのTestスキーマ以下テーブルに対してINSERT/UPDATE/DELETE/SELECTが行えるように設定します。


まずは 1)について、

認証をしない「認証なし」アクセスを許可した場合、UnknownUserとしてInterSystems製品にログインします。

UnknownUserはインストール時の初期セキュリティの指定により初期設定が異なります。(初期セキュリティについて詳細は、記事「インストール時の初期セキュリティについて」をご参照ください。)

  • 「最小」:InterSystems製品の全ての情報にアクセス可能な %Allロールが付与されます。
  • 「通常」以上を指定した場合:ロールは何も設定されません。

このシナリオでは、UnkownUserに対してロールが付与されていない環境(=インストール時の初期セキュリティを「通常」以上とした場合)に対する設定方法を解説します。

手っ取り早くUnkownUserに%Allロールを付与するのも1つの方法ですが、その場合RESTアプリケーション以外の「認証なし」が許可されたアクセスに対しても%Allロールが適用されてしまうため、セキュアな設定とは言えません。このシナリオでは、RESTアプリケーションパスを通過したときのみ適切なロールを付与させることのできる「アプリケーションロール」を利用してロールを付与していきます。

ここで、RESTアプリケーションを動作させるために最低限必要となるアクセス許可はアプリケーションが動作するデータベースに対するREAD許可です。アプリケーションがデータベースに対して書き込みを行う場合はWRITE許可も必要となります。

InterSystems製品では、データベースを作成した際、一緒にセキュリティ設定で使用するデータベースリソースを作成することができます。データベースリソースを作成するとそのリソースに対するREADとWRITEの許可を持ったデータベースロールが自動的に作成されます。

今回はインストールデフォルトで作成されるUSERデータベースにアプリケーションをインストールして利用することにしています。

USERデータベースに対しては、%DB_USERリソースが用意されていてこのリソースに対してREADとWRITE許可を持つ%DB_USERロールが事前に用意されています。この%DB_USERロールをRESTアプリケーションに付与することにします。


さらに、2)では、

2) RESTアプリケーション利用時は、USERネームスペースのTestスキーマ以下テーブルに対してINSERT/UPDATE/DELETE/SELECTが行えるように設定します。

とあるので、Testスキーマに対する適切なテーブル権限が必要となります。テーブル権限はユーザに直接付与することもロールに付与することもできます。

この設定では、RESTアプリケーションにロールを付与したいので、ロールにテーブルの権限も付与することにします。

それでは、ロール:MyAppRoleを作成します。

アプリケーションはUSERネームスペースにアクセスする前提のため、%DB_USERロールを持つ新ロールを作成します。

%SYSネームスペースで実行します。

set $namespace="%SYS"
set status=##class(Security.Roles).Create("MyAppRole","アプリケーション用ロール",,"%DB_USER")

Security.RolesクラスCreate()メソッドに指定する引数は以下の通りです。

第1引数:ロール名
第2引数:ロールの説明
第3引数:リソースの割り当て(未指定もOK)
第4引数:割り当てるロール(複数ある場合はカンマ区切りで指定)

このロールを付与された人やアプリケーションはTestスキーマに対してSELECT/DELETE/UPDATE/INSERTができるようにこれらの権限を含む全テーブル権限を追加します。

set status=$system.SQL.Security.GrantPrivilege("*","Test","SCHEMA","MyAppRole")

%SYSTEM.SQL.SecurityクラスGrantPrivilege()メソッドで指定する引数は以下の通りです。

第1引数:以下のアクションをカンマ区切りで指定します。全部対象とする場合は * を指定します。

  • Alter
  • Select
  • Insert
  • Update
  • Delete
  • References
  • Execute
  • Use

第2引数:対象となるテーブル名やスキーマ名を指定できます。例ではTestスキーマを指定しています。

第3引数:対象となるタイプを指定します。例ではSCHEMAを指定しています。

第4引数:付与するユーザ名またはロール名を指定します。

戻り値を確認します。(1が返れば成功です。)

失敗している場合は、以下の出力をご確認ください。

do $system.OBJ.DisplayError(status)

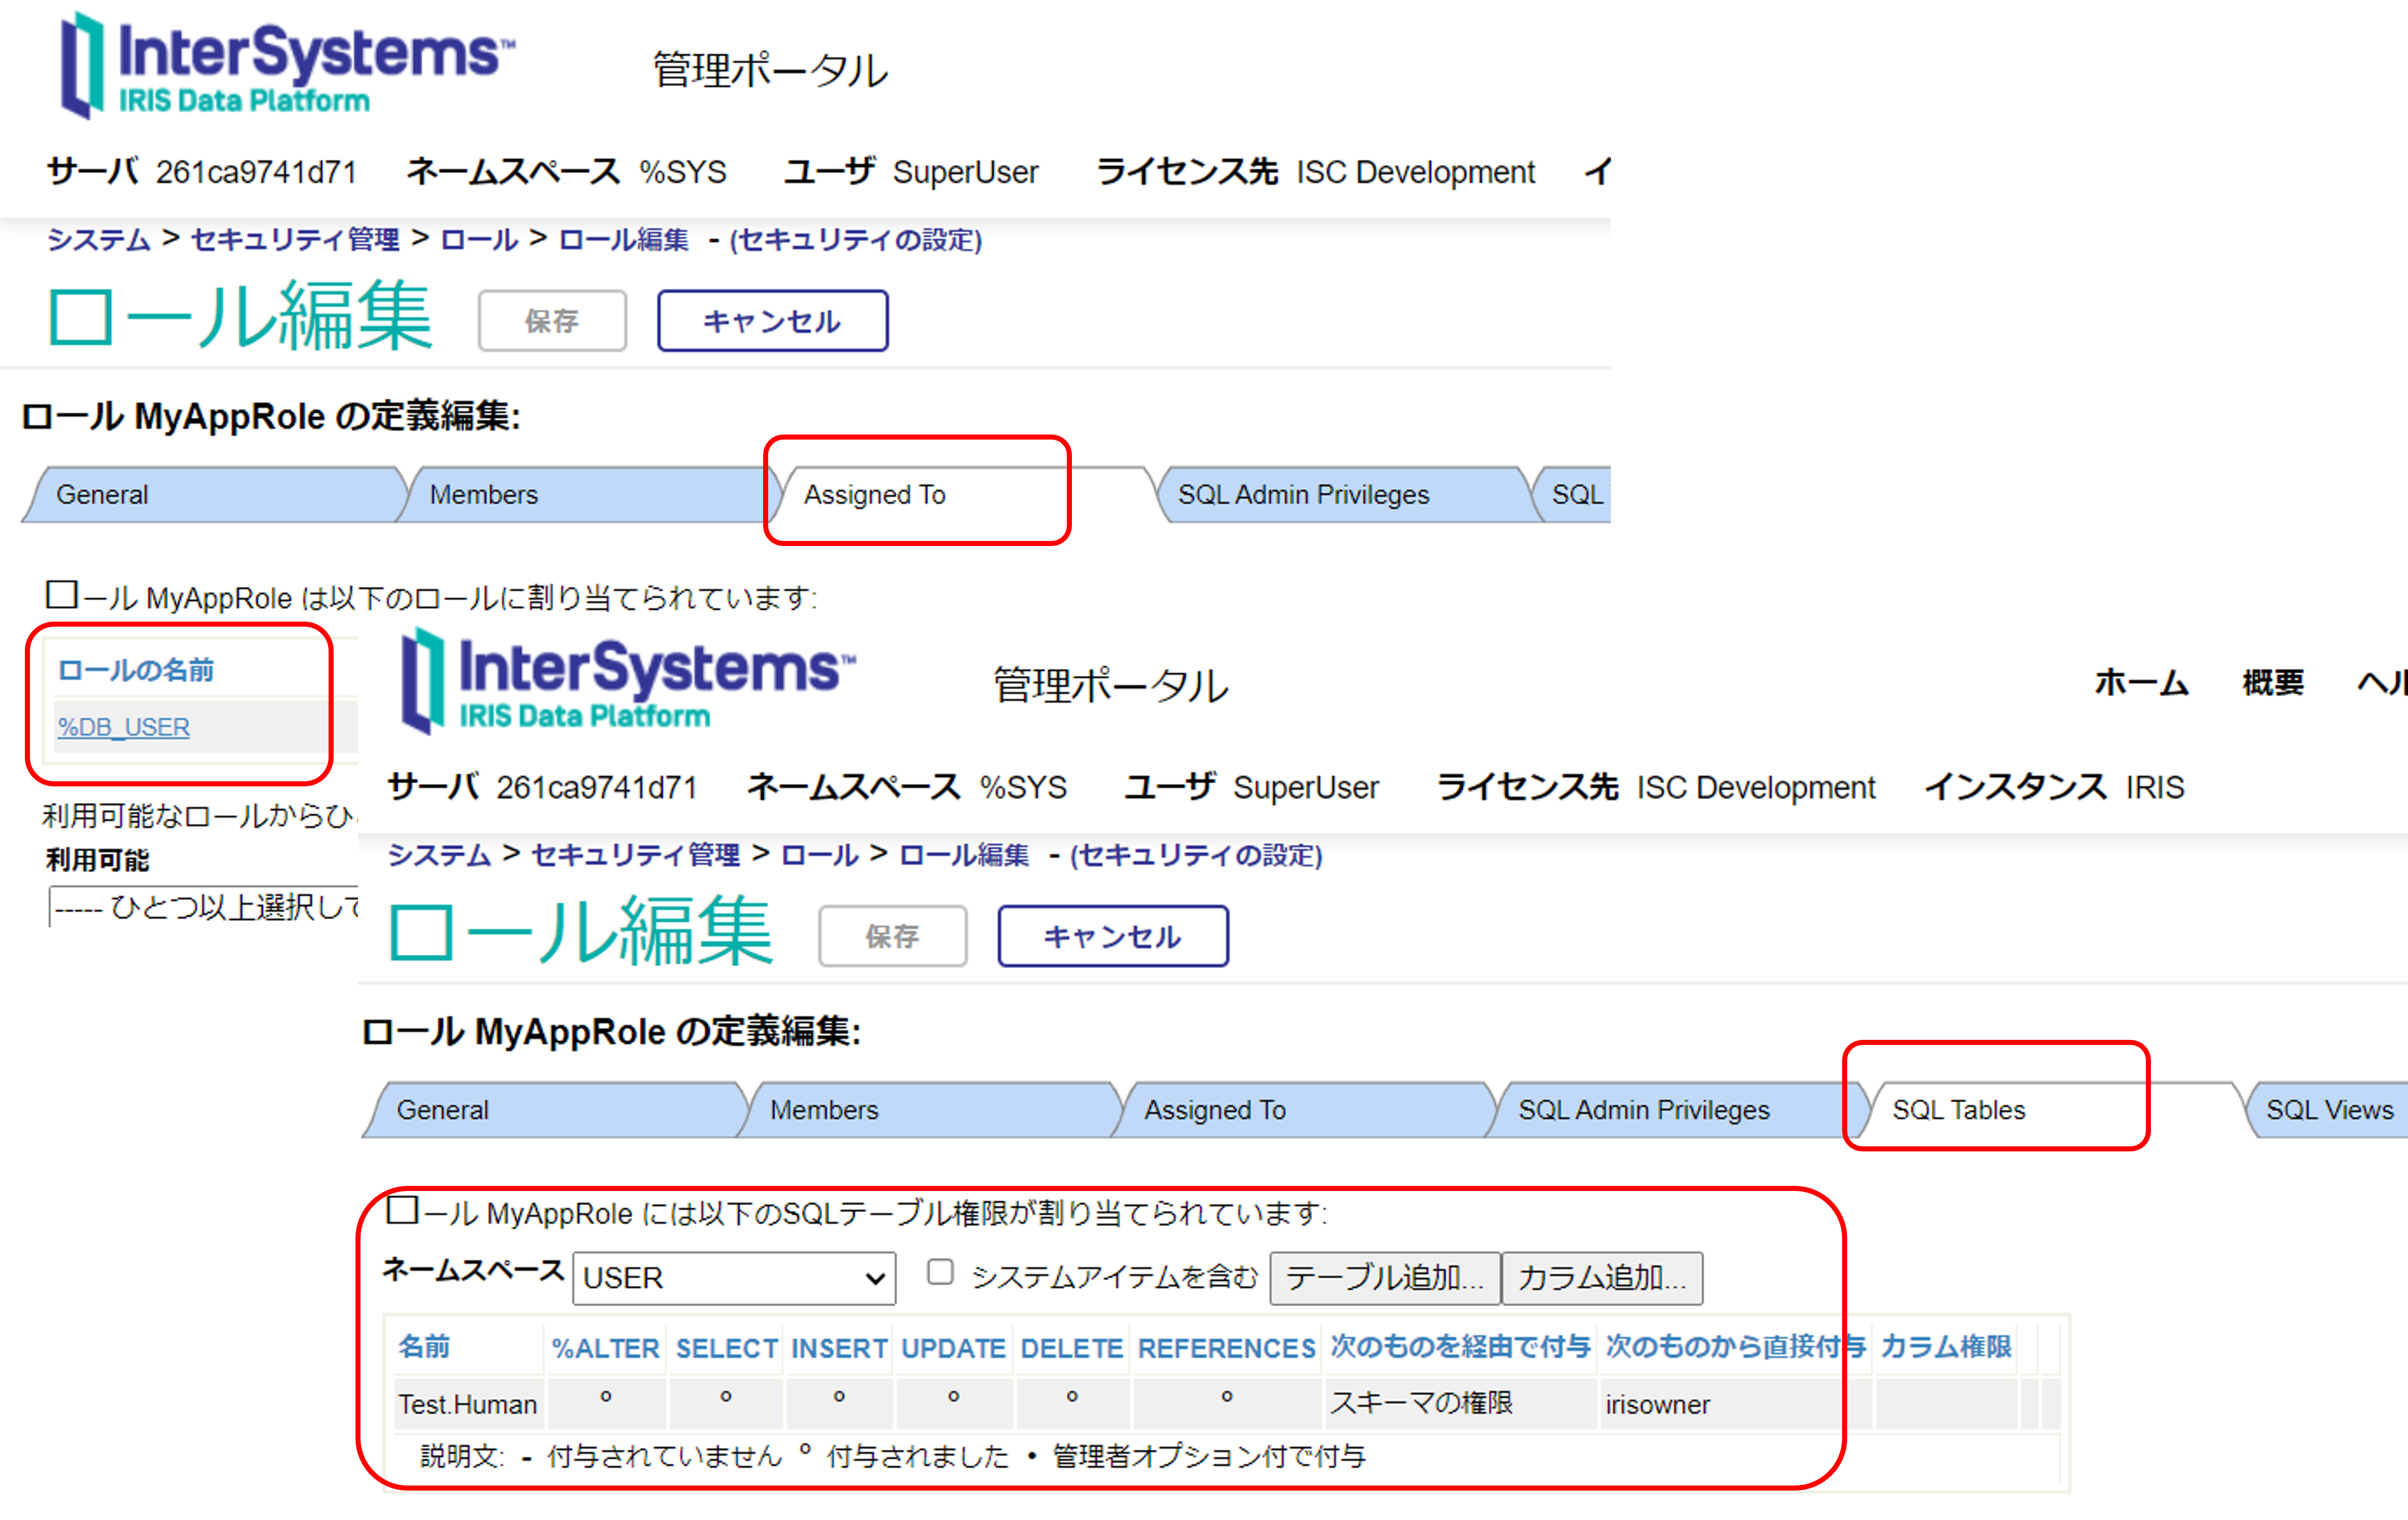
管理ポータルでは以下のように設定を確認できます。

管理ポータル > [システム管理] > [セキュリティ] > [ロール] > [MyAppRole]の[Assigned To]と[SQL Tables]のタブ


作成したMyAppRoleをアプリケーション利用時に追加するようにREST用のウェブアプリケーションを定義します。

作成には、Security.ApplicationsクラスCreate()メソッドを利用します。

Create()メソッドの第2引数には設定に必要な情報を配列変数で指定します。サブスクリプトの指定については以下の通りです。

  • DispatchClass:RESTディスパッチクラス名を指定します。
  • NameSpace:RESTディスパッチクラスがあるネームスペースを指定します。
  • Enable:アプリケーションを有効とする場合は1を指定します。
  • AutheEnabled:認証なしは64を設定します。詳細はAutheEnabledプロパティの説明をご参照ください。(認証なしは Bit 6のAutheUnauthenticated の値を設定します。)
  • MatchRoles:アプリケーション通過時に付与するアプリケーションロールの場合は、:ロール名 を設定します。

%SYSネームスペースで以下実行します。 

set webName="/testApp"
set webProperties("DispatchClass")="Test.REST"
set webProperties("NameSpace")="USER"
set webProperties("Enable")=1
set webProperties("AutheEnabled")=64
set webProperties("MatchRoles")=":MyAppRole"
set status=##class(Security.Applications).Create(webName, .webProperties)

戻り値を確認します。(1が返れば成功です。)

失敗している場合は、以下の出力をご確認ください。

do $system.OBJ.DisplayError(status)

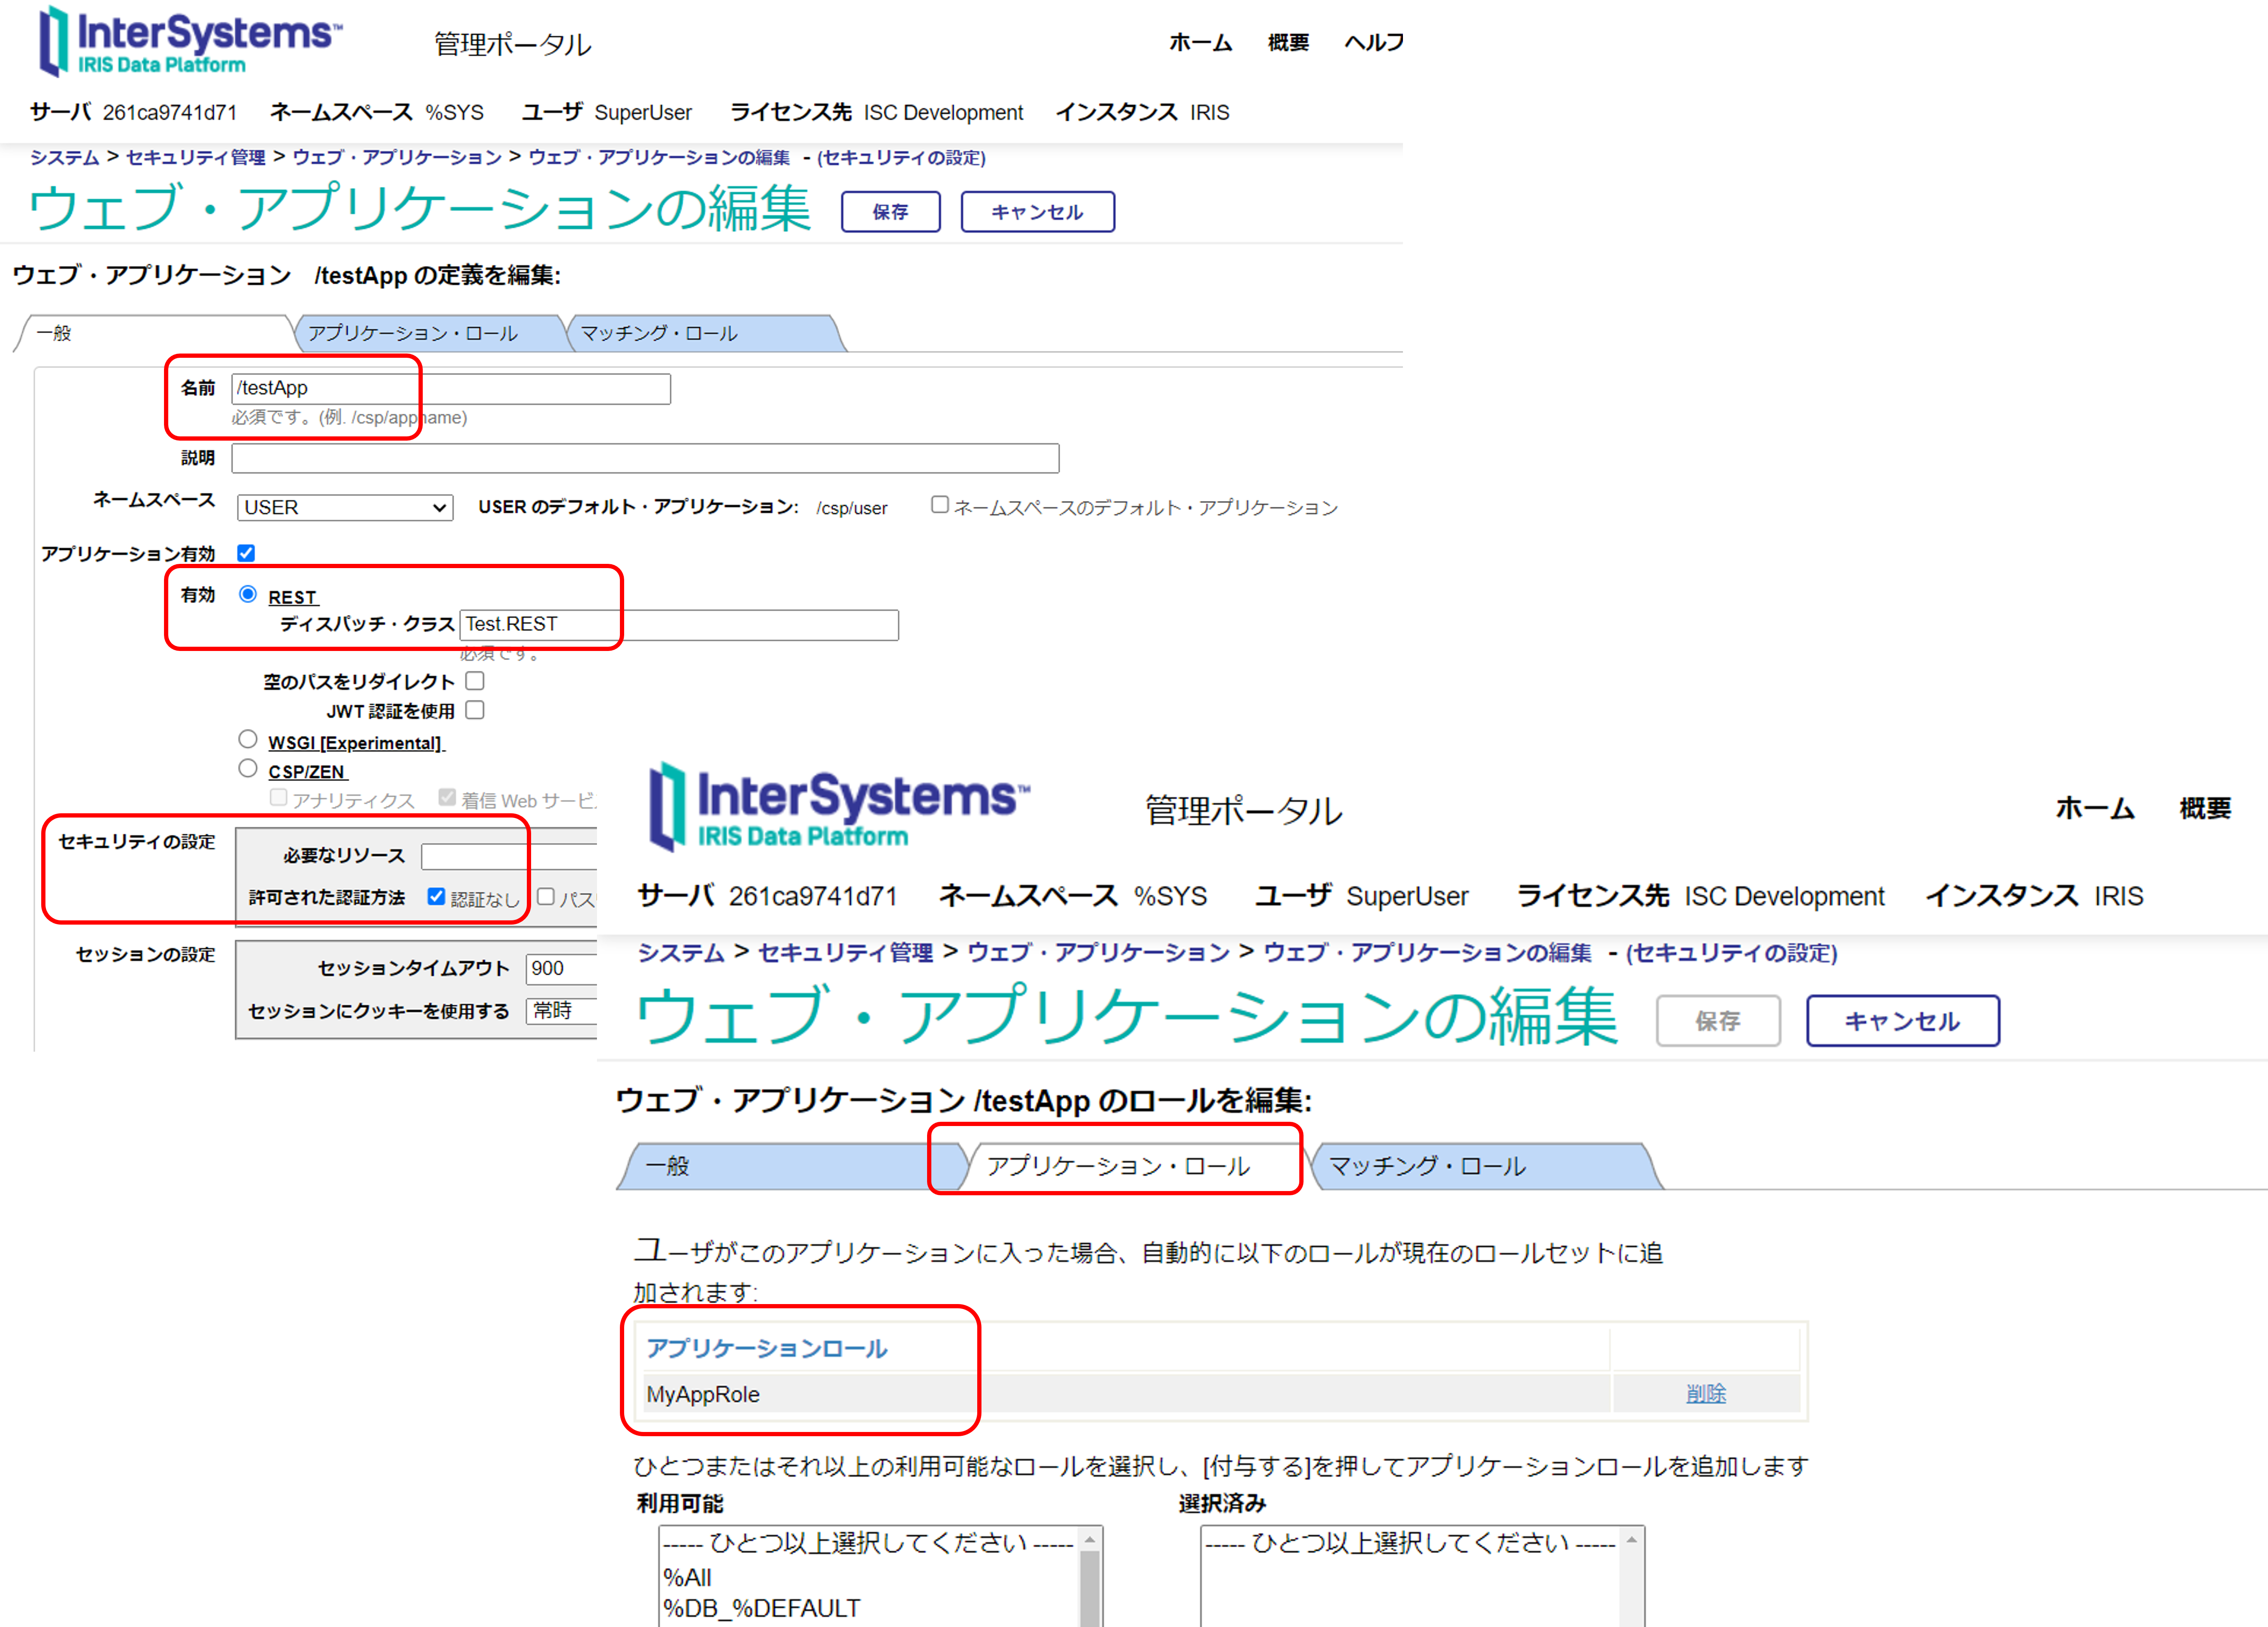
管理ポータルでは以下のように表示されます。

管理ポータル > [システム管理] > [セキュリティ] > [アプリケーション] > [ウェブ・アプリケーション] > /testApp選択


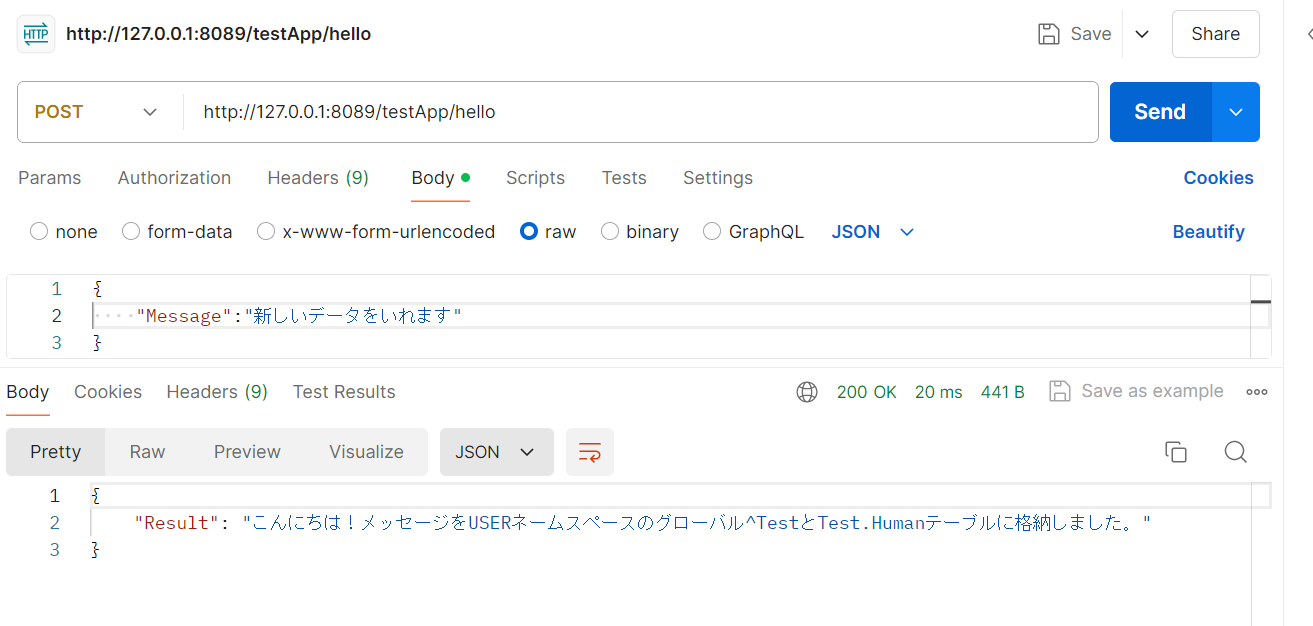
設定が完了したので最初にPOST要求を試します。 URLには、webサーバ/testApp/hello を指定しBodyに以下のプロパティを持つJSONを指定しPOST要求をテストします。

{
    "Message":"新しいデータをいれます"
}

 POST要求が成功すると、以下応答として返送します。

{
    "Result": "こんにちは!メッセージをUSERネームスペースのグローバル^TestとTest.Humanテーブルに格納しました。"
}

グローバル^Test、またはTest.Humanの中身をご確認ください。


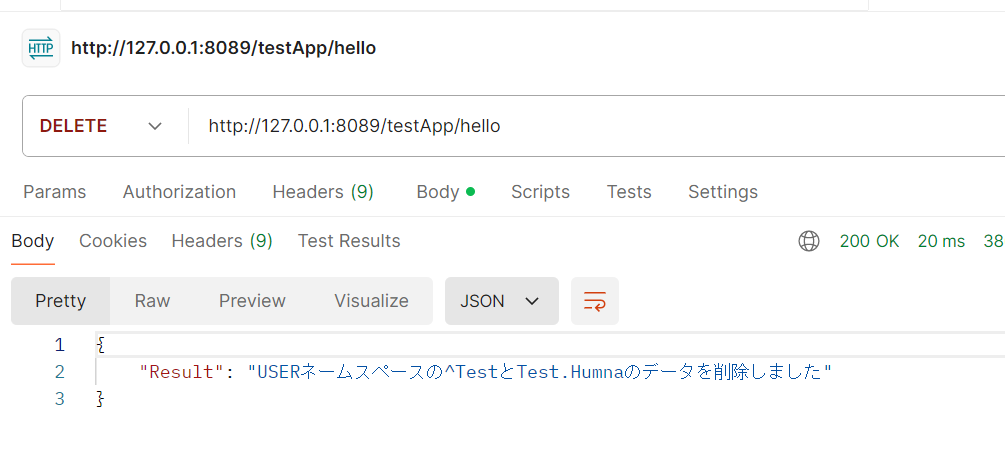
続いて、DELETE要求を実行します。(POSTと同じURLを使用します)

 DELETE要求が成功すると、以下応答として返送します。

{
    "Result": "USERネームスペースの^TestとTest.Humnaのデータを削除しました"
}

グローバル^TestとTest.Humanテーブルのデータが削除されたことを確認してください。


ご参考:RESTアプリケーション(/testApp)にテーブル権限を設定し忘れると以下のエラーが出力されます。

{
    "errors": [
        {
            "code": 5540,
            "domain": "%ObjectErrors",
            "error": "エラー #5540: SQLCODE: -99 メッセージ: User UnknownUser is not privileged for the operation",
            "id": "SQLCode",
            "params": [
                -99,
                "User UnknownUser is not privileged for the operation"
            ]
        }
    ],
    "summary": "エラー #5540: SQLCODE: -99 メッセージ: User UnknownUser is not privileged for the operation"
}
Discussion (0)1
Connectez-vous ou inscrivez-vous pour continuer