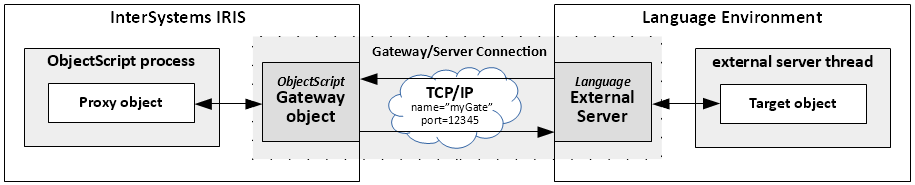
Rechercher

Discussion (0)1
Connectez-vous ou inscrivez-vous pour continuer
InterSystems officiel
· Août 6, 2024

IAM 2.8.4.11 & 3.4.3.11 Release Announcement

InterSystems API Manager (IAM) versions 2.8.4.11 and 3.4.3.11 are now Generally Available.  These are the latest versions of the two long-term supported versions of IAM. These releases contain important fixes, and all customers are encouraged to upgrade.

Customers on IAM 3.0 or 3.2 are encouraged to upgrade to 3.4.3.11 as support for those versions will soon come to an end.

IAM is an API gateway between your InterSystems IRIS servers and applications, providing tools to effectively monitor, control, and govern HTTP-based traffic at scale. IAM is available as a free add-on to your InterSystems IRIS license.

IAM can be downloaded from the Components area of the WRC Software Distribution site

Follow the Installation Guide for guidance on how to download, install, and get started with IAM.  The complete IAM 3.4 documentation gives you more information about IAM and using it with InterSystems IRIS. Our partner Kong provides further documentation on using IAM in the Kong Gateway (Enterprise) 3.4 documentation

IAM is only available in OCI (Open Container Initiative) a.k.a. Docker container format. Container images are available for OCI compliant run-time engines for Linux x86-64 and Linux ARM64, as detailed in the Supported Platforms document.

Discussion (0)1
Connectez-vous ou inscrivez-vous pour continuer
Annonce
· Août 6, 2024

[Video] Updating Legacy UIs for Modern Browsers - Lessons Learned & Steps Forward

Hey Developers,

Play the new video on InterSystems Developers YouTube:

⏯ Updating Legacy UIs for Modern Browsers - Lessons Learned & Steps Forward @ Global Summit 2023

Sometimes the rip-and-replace method of refreshing web user interfaces (UIs) just isn't feasible. The problem is existing UIs will stop working as web browsers continue to remove older features. Learn how our application services team modernized a legacy Internet Explorer dependent application to work in modern browsers.

Presenters:
🗣 @Vivian Lee, Applications Developer, InterSystems
🗣 @Dominic Chui, Applications Developer, InterSystems

Enjoy watching this video! 👍

Discussion (0)1
Connectez-vous ou inscrivez-vous pour continuer
Article
· Août 6, 2024 4m de lecture

Construindo um frontend usando apenas Python

Desenvolvimento de frontend pode ser uma tarefa muito difícil, especialmente para desenvolvedores focados em backend. Mais cedo na minha carreira, as linhas entre frontend e backend eram borradas, e se experava de todos que conseguissem manejar ambos. CSS em particular era um desafio constante, parecia uma missão impossível.

Discussion (0)1
Connectez-vous ou inscrivez-vous pour continuer
Article
· Août 6, 2024 8m de lecture

Firebase Cloud Messaging with IrisFirebase FCM

IrisFirebase - FCM


Hello, Community!

After launching my application in the OpenExchange (IrisFirebase with the functionality to use the Real Time Database of Firebase), I noticed more interesting features from Firebase that we could utilize. That is why when I was checking the possibilities that Firebase bring us, I decided to add a new feature to IrisFirebase FCM!! (Firebase Cloud Messaging).

What?? Do you not know that the key Firebase Cloud Messaging is? Do not worry! I will explain it to you right now.


Firebase Cloud Messaging. “The explanation”:

Firebase Cloud Messaging (FCM) is a service provided by Google. It allows developers to send notifications and messages to such users’ devices as smartphones, tablets, or computers. 

We have a saying here in Spain: “Una imagen vale más que mil palabras” (One picture is worth more than a thousand words). So, here is an example for you to look at:


As you can see in the screenshots, you can send messages with a custom title, body and picture. However, there is another fascinating thing I wish to show you.

Yeah, I know what you are thinking right now… “Hey, that sounds great, but it must also be quite expensive, especially for such a stringy person as me”. So, this is the best part! It is completely free!! Take a look at the proof below:

https://firebase.google.com/products/cloud-messaging


Are you interested in knowing how you could send messages to your apps, web pages, etc…? Lucky you!!! Why? Because I am going to explain to you how to do it in a really easy way. Get your digital stamps and envelopes ready since we are going to “mail” a bunch of “letters”. Let’s go! 


Preparing our environment:

If you examined my previous post explaining how to use IrisFirebase, you would have an App already configured in Firebase with a running instance of IrisFirebase. In case you did not read it, please follow the steps, 1, 2, 4, 5 and 6 from the article below:

https://community.intersystems.com/post/firebase-module-unleashing-power-firebase-realtime-database-intersystems-iris

Ok, if you have taken all the steps properly, you would have a running instance of IrisFirebase by now, so let’s continue.


First step: configure your app to use FCM:

To be able to send messages, you should configure FCM in your Firebase App first.

Enter your Firebase console and select your project (in my case, it is IrisFirebaseExample):


Now, press the button All Products:


Search for the product “Cloud Messaging”:


Now, you must add one or more apps depending on whether you are developing an application for Android only or for several different platforms. (In my case, I opted for Android):

(If you plan to send messages to iOS, you must have a paid Apple developer’s account since you need to generate a certificate).


Fill in the required gaps with the information about your App/web (the SHA-1 field is optional):


After a few seconds, a screen asking you to download the configuration file will appear. Press “Download google-service.json” and keep it safe because it is crucial for your work. (You must copy it to the root of your app’s project later on). After saving the file, press the Next button.


The next step will explain how to add the Firebase SDK to your app.


This step changes if you create an app with Kotlin, Groovy, Flutter, etc., so check out how to do it. In my case, I used Flutter, and the easiest way to do it is by installing the Firebase CLI:

https://firebase.google.com/docs/android/setup

I will not explain these steps because they are beyond the scope of this tutorial. However, feel free to ask me any questions in the comments.

So, let’s continue by pressing the “Next” button.

At this point, we have finished the Firebase Console side. Congratulations, you have passed the boring part!!!


Second Step: Configure IrisFirebase.FCM:

If you have configured the previous App in IrisFirebase with Firebase RealTime Database, you can use it with FCM. If you do not have the App, you can configure it by launching the method ConfigApp from the class Firebase.Helper.cls. You can find an example of how to do it in the class Test.TestFCM.cls:

ClassMethod init()
{
  Do ##class(Firebase.Helper).ConfigApp("appNotas",””,"irisfirebaseexample.json")
}

Remember to use your private params (the second URL parameter is only mandatory for the RealTime Database; it is not applicable for FCM, so you can omit it or send it blank.

Great! Now we have all the systems configured: our IrisFirebase instance with FCM and our App or Web with the Firebase SDK.

It is time to start sending messages!


Third Step: sending a message to a one device:

To send a message to a particular device, you must know the token ID of the app you want to notify.

You can get this token ID from the app/web that you are using. Below, you can find an example of how to get the token ID of an instance of your app installed on an Android device with Flutter programmatically:


With this code you will get the “token” variable. The token ID will look similar to the following:

fErQlmmjTsq2E2-p7RN6zD:APA91bFhdeCGit17QSIXrlbfovr59BgviGIDHI0nnp7t9i_YFKAPSACkTvP_iKOV-b3Xaj73uhl7Z0S41vfmH_YVV8Ep9Evad69-s1Hkt9pu3VrkeZQGTc8vAJgKSY1qkhuP7HU6t7UJ


Depending on how you use your app, you might prefer to store this token ID in Iris with an ID that identifies your customer. To do it, you can employ the method SaveToken. You can find an example of how it works in the class Test.TestFCM.cls

ClassMethod TestSaveToken()
{
  Set token = "fErQlmmjTsq2E2-p7RN6zD:APA91bFhdeCGit17QSIXrlbfovr59BgviGIDHI0nnp7t9i_YFKAPSACkTvP_iKOV-b3Xaj73uhl7Z0S41vfmH_YVV8Ep9Evad69-s1Hkt9pu3VrkeZQGTc8vAJgKSY1qkhuP7HU6t7HJ"
  Set appName = "appNotas"
  Set id = 123456
  Do ##class(Firebase.FCM).SaveToken(appName, token, id)
}


ID in this case could be your client ID number or whatever ID that could help you to identify this device in the future.

So, now we are completely ready to send a message. To do it, you can use one of the following methods:

The first method: send messages directly to a token (Send Method), Check out the example below:

ClassMethod TestSendMessage()
{
 Set appName = "appNotas"
 Set title = "IrisFirebase FCM"
 Set body = "Now you can send messages from Iris using IrisFirebase!!!"
 Set image = "https://openexchange.intersystems.com/mp/img/packages/3553/vaeo3isvwgubxb2ya7vb0c9edgs.jpeg"
 Set token = "fErQlmmjTsq2E2-p7RN6zD:APA91bFhdeCGit17QSIXrlbfovr59BgviGIDHI0nnp7t9i_YFKAPSACkTvP_iKOV-b3Xaj73uhl7Z0S41vfmH_YVV8Ep9Evad69-s1Hkt9pu3VrkeZQGTc8vAJgKSY1qkhuP7HU6t7HJ"
 Set data = {}
 Set data.param1 = "param1 value"
 Set data.param2 = "param2 value"
 Set result = ##class(Firebase.FCM).Send(appName, token, title, body, image, data)
 If (result = 1)
 {
  U 0 W "Message sended OK"
 }Else{
  U 0 W "Error sending message"
 }

}


As you can see, to send a message you will need the next items:

AppName: It is the app name that you wrote in the ConfigApp method.

The Title, Body and Image are explained in the screenshot:


Token: It is the token ID that you have obtained from the app.

Data: This is a really interesting tool (data is a JSON dictionary with a pair of key values where you can send custom-hidden data to the device). Maybe you are sending to your customer the details of his next appointment, so you can use this structure to send info to be displayed in your app or whatever you wish.


The second method: send a message to a client (or whatever) ID:

In this case, you can use the method SendMessageToId. Look at the example below:

ClassMethod TestSendMessageToId()
{
 Set appName = "appNotas"
 Set id = 123456
 Set title = "título"
 Set body = "Cuerpo Mensaje"
 Set image = "https://openexchange.intersystems.com/mp/img/packages/3553/vaeo3isvwgubxb2ya7vb0c9edgs.jpeg"
 Set token = "fErQlmmjTsq2E2-p7RN6zD:APA91bFhdeCGit17QSIXrlbfovr59BgviGIDHI0nnp7t9i_YFKAPSACkTvP_iKOV-b3Xaj73uhl7Z0S41vfmH_YVV8Ep9Evad69-s1Hkt9pu3VrkeZQGTc8vAJgKSY1qkhuP7HU6t7FD"
 Set data = {}
 Set data.param1 = "param1 value"
 Set data.param2 = "param2 value"
 Set result = ##class(Firebase.FCM).SendMessageToId(appName, id, title, body, image, data)


 If (result = 1)
 {
  U 0 W "Message sended OK"
 }Else{
  U 0 W "Error sending message"
 }
}

As you can see, the difference between the previous method and this one is that in this case, you must know the ID of your saved token instead of using the token with the method SaveToken.

The rest of the parameters are the same.


The last Step: sending the same message to all the instances of your App/Web:

For this purpose, you can use the native Firebase tool to send campaigns.

Go to the Firebase Console, enter your project, and press the “Messaging” button:


In this screen, you will be able to create a new campaign press “New Campaign” then “Notifications”:


You will see the detailed explanation of the steps you need to take to send the same message to all the instances of your app. 


If you wish, you can apply some filters during the process:


You will be able to schedule your campaign or send it immediately:


You could also add some analytics:


You could also establish the behaviors of the notification:

When you are ready, press Review and Publish.

Your new campaign will appear in the Messaging section.

If you have previously selected the option send now, in a few seconds you will receive the notification:


In Firebase, they claim to be able to send millions of messages in seconds. So, if you plan to send the same message to all your customers, I recommend you create a campaign instead of sending the same message to all your customers one by one from IRIS. On the other hand, if you are sending the message to a group of clients or if the message should be customized for every customer, sending it from IrisFirebase is the best option!.
 

Click the link below to find the new version of IrisFirebase with FCM on the OpenExchange:

https://openexchange.intersystems.com/package/irisfirebas


To discover the code of the app in Flutter that I used in this tutorial, check out the following link:

https://github.com/daniel-aguilar-garcia/push_app_flutter_example


That is all for now. I hope you will find the new feature intriguing and use it a lot!

Please, let me know in the comments what you think about this new feature. Hit me up also if you are interested in me adding some new elements to the IrisFirebase.


Thanks for reading!!

4 Comments
Discussion (4)2
Connectez-vous ou inscrivez-vous pour continuer