IRIS has the likes of SQL inbound adapters for use with SQL gateways such as EnsLib.SQL.InboundAdapter to repeatedly query SQL Gateway connections. A scenario appeared as that we wanted to query an Internal database for some data but did not see an out of the box service for this.
Desired Approach
Have a Generic service that can poll internal SQL to work with downstream components.
How
What was not clear was "How do I send a result set downstream". It was not very clear as a resultset itself is not a peristent class and the object cannot be "Swizzled" an error like so
<METHOD DOES NOT EXIST>zNewRequestMessage+4^Ens.MessageHeader.1 *%GetSwizzleObject,%sqlcq.SRFT.cls535 -- logged as '-'
number - @''
The solution was using the object
EnsLib.SQL.Snapshot
This can then be used as a business operation to send a resultset downstream in using the function Import from resultset
set result=##class(EnsLib.SQL.Snapshot).%New()
// Some SQL query here resulting in resultset where rset is the resultset objectset tSC=result.ImportFromResultSet(rset)
You can then send this on to another operation
set tSC=..SendRequestAsync(..ForwardComponentName,result,0) Quit:$$$ISERR(tSC)
Note in the code uploaded to open exchange available here via github . The example is you can open it up and query it. The below is the classmethod that is used to put into a html. This differs from released example slightly as is taken from a live implementation.
ClassMethod GetDataTable(pRequest As EnsLib.SQL.Snapshot, html As%String) As%String
{
//first html obj can be if the styling needs passedif$ISOBJECT(html){set html=""}
//loop get column titles set ColumnIteration=1set ColumnCount=pRequest.%ResultColumnCountGet()
set html=html_" <table class=""tg"">"set html= html_ " " _"<tr>"set meta=pRequest.%GetMetadata() //this is like raw text of the result using it to get the column titles outif ColumnCount>0{
while ColumnIteration<=ColumnCount{
set html= html_ " <th>"_ meta.columns.GetAt(ColumnIteration).colName _" </th>"set ColumnIteration=ColumnIteration+1
}
}
set html= html_ " " _"</tr>"//not get the data from each row. In html need a <tr> and a td. set coldataiteration=1While pRequest.%Next() {
set html= html_ " <tr>"while coldataiteration <=ColumnCount{
set html= html_ " <td> "_pRequest.%GetData(coldataiteration) _" </td>"set coldataiteration=coldataiteration+1
}
set html= html_ " </tr>"set coldataiteration=1
}
set html= html_ " " _"</table>"$$$TRACE(html)
return html
}
Artificial intelligence is not limited only to generating images through text with instructions or creating narratives with simple directions.
You can also make variations of a picture or include a special background to an already existing one.
Additionally, you can obtain the transcription of audio regardless of its language and the speed of the speaker.
So, let's analyze how the file management works.
The Problem
When analyzing the OpenAI information about the methods that require a file as an input value, the parameters must be provided using a multipart/form-data.
In IRIS we know how to create a call to a POST method using JSON content. However, in this case, using a parameter with the file content in Base64 format will not be practical.
To include the file content in a multipart/form-data, you must employ the class %Net.MIMEPart.
To include a file in our call, you should create a Content-Disposition header associated with the class object %Net.MIMEPart
set content = ##class(%Net.MIMEPart).%New()
set contentDisposition = "form-data; name="_$CHAR(34)_"image"_$CHAR(34)
set contentDisposition = contentDisposition_"; filename="_$CHAR(34)_fileName_$CHAR(34)
do content.SetHeader("Content-Disposition",contentDisposition)
Since we utilize a Request class to retain the values of our process, we must convert the Base64 content into a stream that will constitute the Body of our content.
We can operate the StreamUtils utility to convert the Base64 into a Stream.
Note: the “pImage” variable contains the Base64 string of the file content.
Do##class(HS.Util.StreamUtils).Base64Encode(pImage, .tStream)
Set content.Body = tStream
Yet, there is a better trick that I was lucky enough to learn from an InterSystems expert at the Global Summit 2023. He taught me that the execution is more effective than StreamUtils, which, in the end, has a loop that reads the String and records in the Stream.
This solution is as simple as using a JSON and doing the Get that converts it into a Stream.
set contentfile = {}
set contentfile.file = pImage
set content.Body = contentfile.%Get("file",,"stream<base64")
Once we have included all the parameters required in the call, we can finally create a new MIMEPart class to enclose the parts.
Set rootMIME = ##class(%Net.MIMEPart).%New()
do rootMIME.Parts.Insert(content)
set writer = ##class(%Net.MIMEWriter).%New()
set tSC = writer.OutputToStream(tHttpRequest.EntityBody)
set tSC = writer.WriteMIMEBody(rootMIME)
Set tContentType = "multipart/form-data; boundary="_rootMIME.Boundary
set tSC = ..Adapter.SendFormDataArray(.tHttpResponse, "POST", tHttpRequest,,,url)
This is how we send the file content to the method we need in OpenAI.
Image files
The image method allows you to send a picture and perform a variation. Since all illustrations must be in PNG format, when we indicate the file content in Base64 format, the file name is generated randomly with the PNG extension.
Here is an example of how it alters a photo.
Original
Variation
As you can see, the program has interpreted instructions in its own way.
It has decided that the company logo was a circle, so it has replaced it with another one. It has also recognized that the office had a glass door and substituted it with another one but with a brick wall for now.
Besides that, it has modified the color of the shirt and changed the position of the man's arms.
Additionally, OpenIA allows you to edit an image by providing a mask with the area where you want to insert the content indicated in the prompt.
Utilizing the same image, I have applied a mask that has removed the image background.
Original
Mask
When I asked it to transport me to a Jamaican beach, I got the following result:
Now you can brag about your holidays the next time you see your friends and family 😊
It allows you to create a modification of an already existing image. Since it does not require a prompt indicating how you want to alter it, we have to trust the AI's taste in how it would interpret this image. In addition, we can define the size and the way we want the result to be returned, be it through a link or content in Base64.
The input parameters would be as mentioned below:
image: Required
Here, you mention the image file that you want to transform.
n: Optional. Default 1
In this area, you determine the maximum number of images to generate. (Use numbers between 1 and 10).
size: Optional. Default 1024x1024
This parameter characterizes the size of the generated image. The value here must be “256x256”, “512x512”, or “1024x1024”.
response_format: Optional. By default, it is “url”
This element is about the format of how you wish the generated images to be returned. The values here should be “url” or “b64_json”.
It lets you modify an existing image that, based on the mask file, will create a picture according to the prompt. Besides, we can specify the dimensions and the way we want the result to be returned to us, whether through a link or content in Base64.
The input parameters should be as follows:
image: Required
Here, you mention the image file that you want to alter.
mask: Required
This part is about the mask image file that should be applied.
n: Optional. Default 1
In this area, you determine the maximum number of images to generate. (Use numbers between 1 and 10).
size: Optional. Default 1024x1024
This parameter characterizes the size of the generated image. The value here must be “256x256”, “512x512”, or “1024x1024”.
response_format: Optional. By default, it is “url”
This element is about the format of how you wish the generated images to be returned. The values here should be “url” or “b64_json”.
Audio files
Images are not the only ones to be managed by OpenAI. We can also use audio files to obtain a transcription or translation of the provided recording.
This method uses the Whisper model, which allows you to differentiate proper names, brands, and slang to provide correct transcription and translation. For instance, talking about the “micromachine” as a brand is not the same as translating “micro machines” as a common noun into Spanish.
The upcoming example is a transcription of a well-known advertising spot from the 80s:
So, the result of instructing Whisper to make a transcription of the audio for us is as stated below:
{
    "text": "This is the Micromachine Man presenting the most midget miniature motorcade of micromachines.
Each one has dramatic details, terrific trim, precision paint jobs, plus incredible micromachine pocket playsets.
There's a police station, fire station, restaurant, service station, and more. Perfect pocket portables to take anyplace.
And there are many miniature playsets to play with and each one comes with its own special edition micromachine vehicle and
fun fantastic features that miraculously move. Raise the boat lift at the airport, marina, man the gun turret at
the army base, clean your car at the car wash, raise the toll bridge. And these playsets fit together to form a micromachine world.
Micromachine pocket playsets, so tremendously tiny, so perfectly precise, so dazzlingly detailed, you'll want to pocket them all.
Micromachines and micromachine pocket playsets sold separately from Galoob. The smaller they are, the better they are."
}
It is Amazing! Don't you think so?
The abovementioned outcome is possible due to the training the Whisper model has received. We can see some information about it in the following diagram offered by the OpenAI page.
Remember that it is crucial to inform the program about the file name because the service needs to know what type of file it is processing (e.g. WAV, MP3, OGG, etc).
Since we only include the Base64 content in our call, we must also indicate the file extension to create the file name with random text and the suggested extension.
For example, the St.OpenAi.Msg.Audio.AudioRequest message has the “type” property to reveal the kind of audio: MP3, OGG, WAV, FLAC, etc.
This method lets you transcribe the audio content into the audio language.
The input parameters should be as follows:
file: Required
Here you specify the audio file that you want to transcribe (not the file name). It supports the following formats: FLAC, MP3, MP4, MPEG, MPGA, M4A, OGG, WAV, or WEBM
model: Required.
The model to use to make the transcription. For now, only “whisper-1” is available
language: Optional. By default, it is the audio language.
If indicated, according to ISO-639-1, it will improve accuracy and latency.
prompt: Optional.
It is an optional text to guide the style of the model or continue the previous audio segment. The message here must match the language of the audio.
response_format. Optional. By default, it is “json”.
In this part, you clarify the format of the transcription output. Use one of the following options: “json”, “text”, “verbose_json”.
temperature: Optional. By default, the value is 0.
The sampling temperature should be between 0 and 1. While higher values like 0.8 will make the output more random, lower values like 0.2 will make it more focused and deterministic. If set to 0, the model will use the log-likelihood to increase the temperature automatically until certain thresholds are reached.
This method lets you translate the audio content into English.
The input parameters should be as follows:
file: Required
It is the audio file that you wish to translate (not the file name). It supports the following formats: FLAC, MP3, MP4, MPEG, MPGA, M4A, OGG, WAV, or WEBM
model: Required.
In this field, you type the model to utilize to make the transcription. For now, only “whisper-1” is available.
prompt: Optional.
It is an optional text to guide the style of the model or continue the previous audio segment. The message here must be in English.
response_format. Optional. By default, it is “json”.
Here you determine the format of the transcription output in one of the following options: “json”, “text”, “verbose_json”.
temperature: Optional. By default, the value is 0.
The sampling temperature comes between 0 and 1. Whereas higher values like 0.8 will make the output more random, lower values like 0.2 will make it more focused and deterministic. If set to 0, the model will employ log-likelihood to raise the temperature automatically until particular thresholds are reached.
I made a custom application metric, imported it to the USER namespace and used:
set status = ##class(SYS.Monitor.SAM.Config).Add.ApplicationClass("historymonitor.errorSensor", "USER")
to add it. When I do 'w status' it returns 1 so it is added but I still can't see the custom metric in the api/monitor/metrics endpoint. Even though I added %DB_USER in the application roles for api/monitor.
Does anyone know where the problem might be that the metrics endpoint still doesn't show my metric?
 Open Exchange


.png)
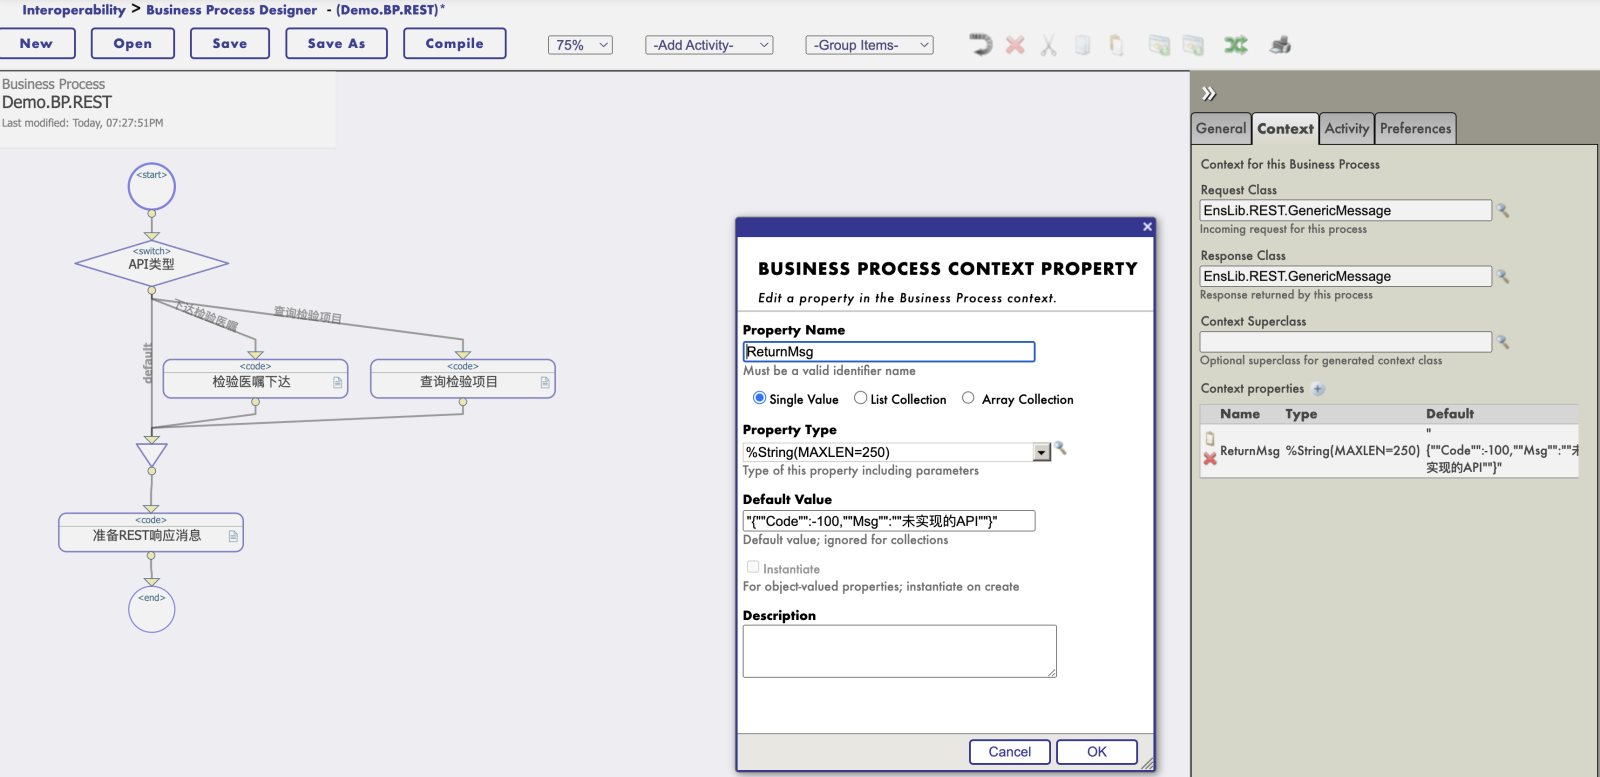
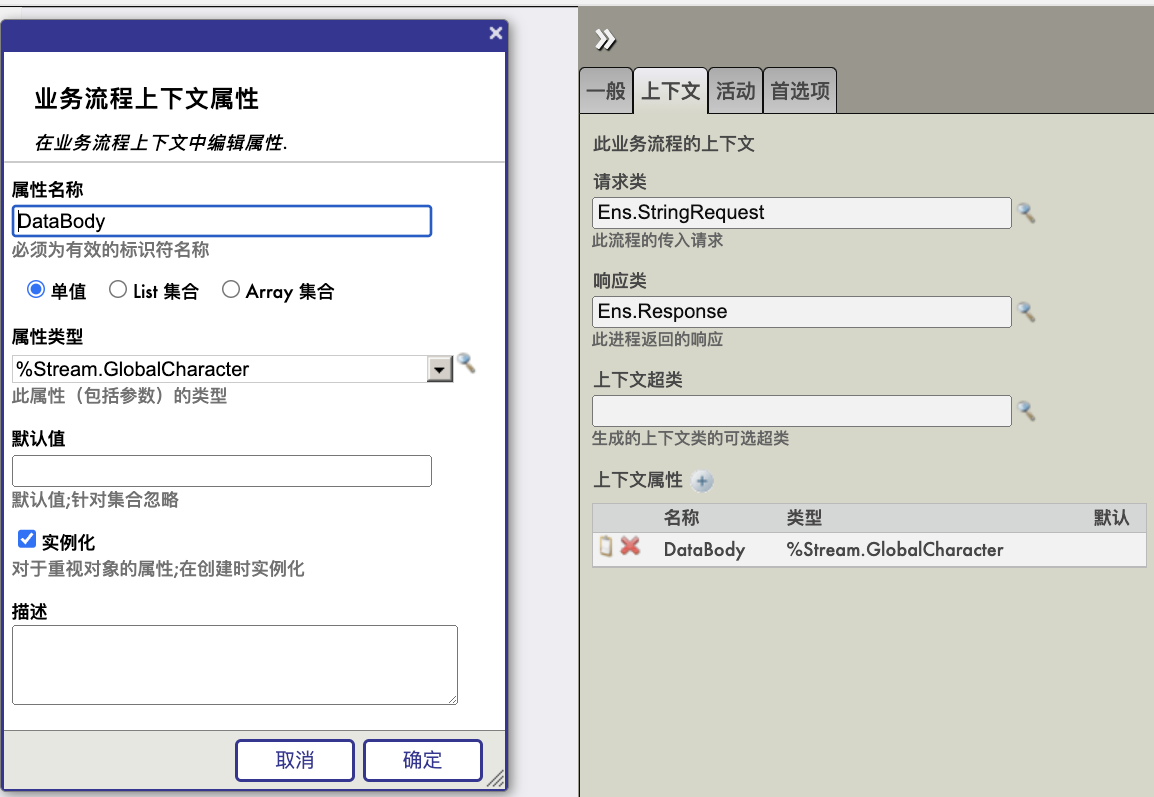 2. 在业务流程中增加一个代码流程(<code>),将请求消息的字符串数据写入上下文的DataBody字符流:
.png)
.png)
.png)
.png)
.png)
.png)
.png)
.png)
.png)
.png)
.png)
.png)
.png)