Have you ever thought what could be a reason why some development environment (database, language) would eventually become popular? What part of this popularity could be explain as language quality? What by new and idioms approaches introduced by early language adopters? What is due to healthy ecosystem collaboration? What is due to some marketing genius?
When I was working for Intersystems as Sales Engineer in their Russian office, we have discussed these things many times: we have experimented with meetups, new forms of working with IT community; we have seeded and curated forums and communities (Russian-specific and word-wide). Despite a very small chances to impact language development (we will leave this topic for future discussions), the assumption was that we, with the help of community in general, could try to improve the state with development tools used by community. And there is 1 very important tool, which might produce nuclear effect to the growth of community – the package manager.
Let me put it crystal clear, here is the problem as I see it in the Caché developers’ community now – be you are the newbie or be you the experienced COS/Ensemble/DeepSee developer: it is very hard to find any usable 3rd party component, library or utility. They are widely spread over the Internet (I know many on GitHub, some on SourceForge, and rare ones are on their own sites, etc, etc). Yes, they are many even for our own, not very big community size useful components or tools (there are even standalone debugger or VCS) but it takes some time to discover all the useful location, and get used to this situation. (Worth to note. that we did grow up the last year, thanks to Developer Community efforts, but still is very small comparing to other community sizes).
There is no single location where to find (they are many and they are spread) and there is no convenient way to install extension or utility.
So we return to the package manager, what it is, why it is so important from our prospective?
Packages usually consist of metadata, and compressed archive payload. They supposed to be searchable on the central repository and easily installable via single command. Worth to note, that some operating systems add monetization over the package management facilities, but it’s not a requirement for open-source ecosystem package manager. The core idea of package manager – to be of some help in finding modules and applications.
IMVHO, presence of a package manager(s) is the most important ingredient for the language and ecosystem success in a longer run. You could not find any popular language community where there would be no convenient package manager with huge collection of available 3rd party packages. After all these years spent hacking in Perl, Python, JavaScript, Ruby, Haskell, Java, (you name other) you pretty much used to the fact that when you start a new project you have a plenty of external and ready-to-use components which may help you to cook the project quick and seamless. `package-manager install this`, `package-manager install that` and in a few easy steps you get something working and useable. Community is working for you - you just relax and enjoy.
These words about CPAN and its experience are pretty much characterizing the importance of the precedent of CPAN and it's later impact toother languages and environments:
The CPAN has grown so large and comprehensive over the years that Perl users are known to express surprise when they start to encounter topics for which a CPAN module doesn't exist already."
There are multiple package managers of different flavors, be they source-based, or binary-based ones, be they architecture specific, or OS-specific or even cross-platform. I will try to cover them to some degree below.
Simplified history of package managers
Here is approach we will use: get most important operating systems and language package managers, put them to the timeline, explain their specifics and interest for us, then, we will try to proceed some generalizations and conclusions for Caché as a platform.
“Picture worth a thousand words" so I have drawn this silly timeline, which mentions all "important" (at least, from my personal point of view) package managers which were used till the moment. Upper part is for language-specific package managers, but lower part is for operating system/distribution specific ones. X-axis steps is by 2 years (from January 1992 until today).
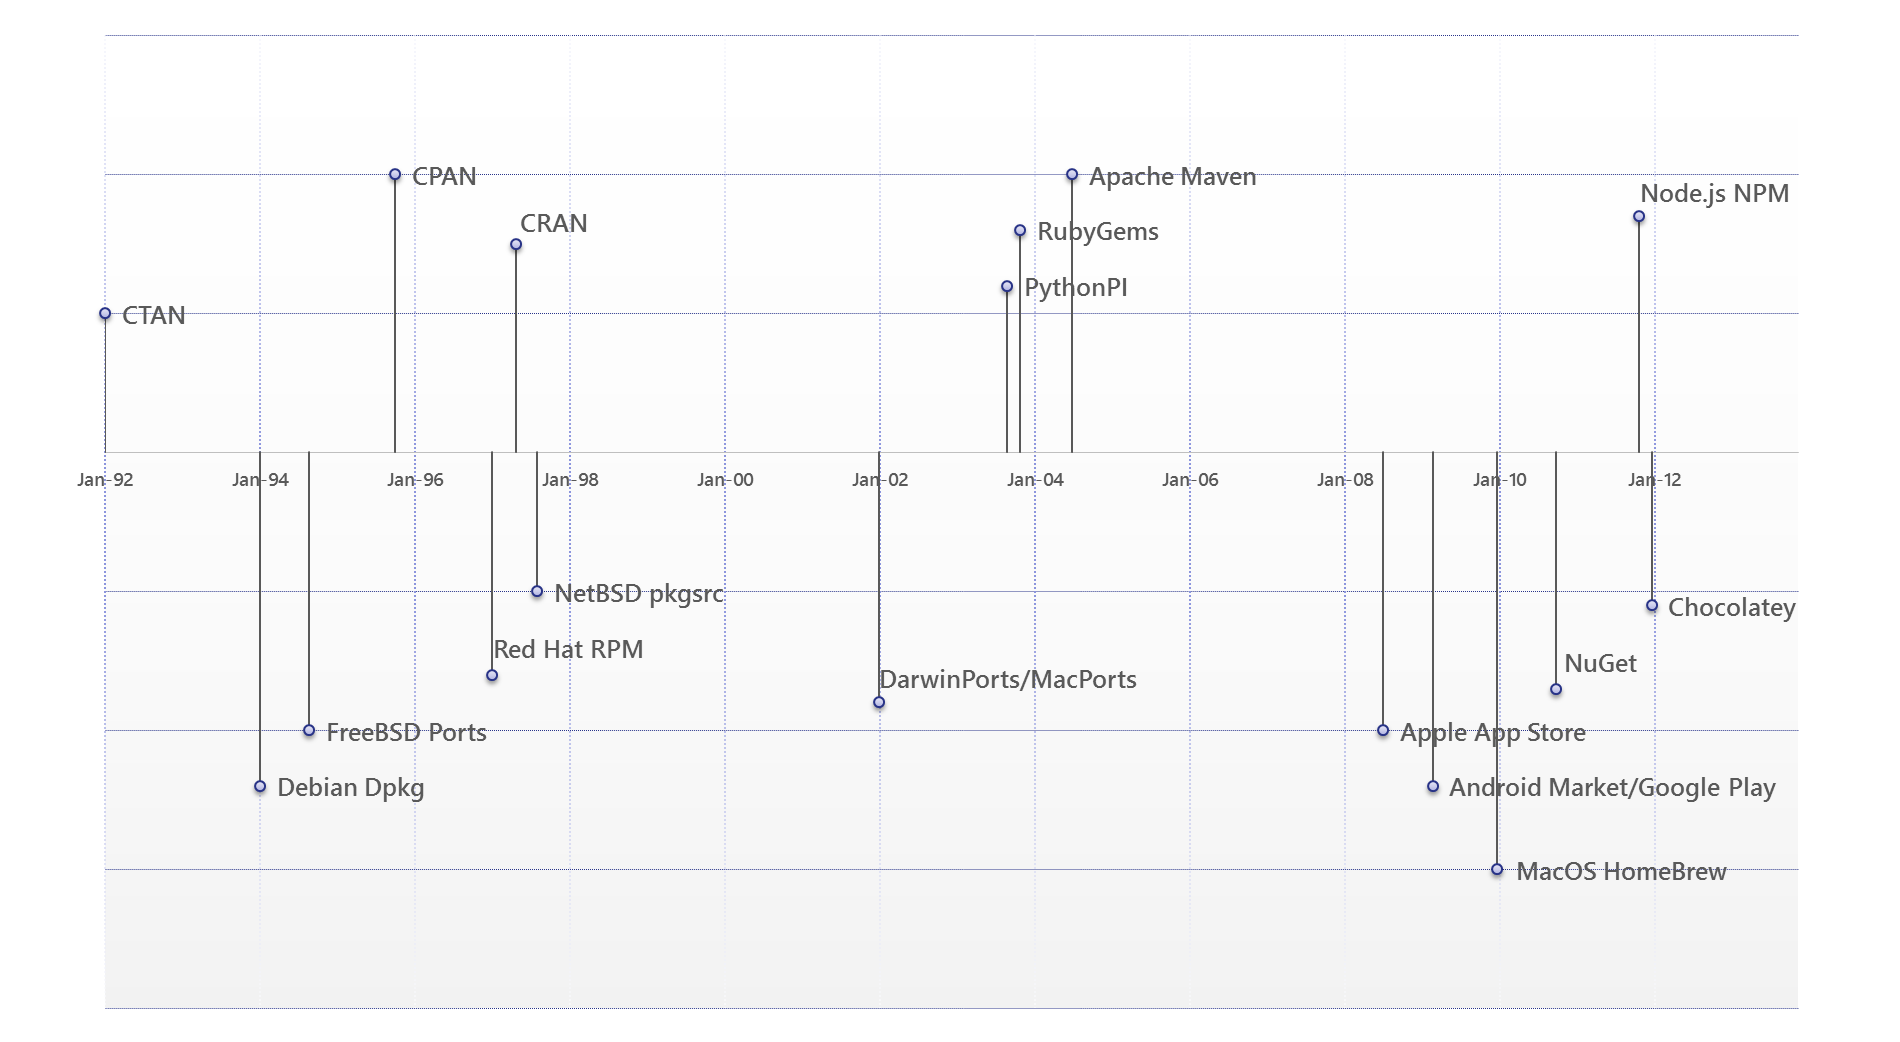
Package managers: Timeline from 1992 till now
CTAN, CPAN & CRAN
Nineties of last century were years of source-based package managers. At that moment, internet is already started used as distribution media (though multiple of different kinds of offline distribution still were used), but, in general, all package managers were operating on the same scenario:
- Given the requested package name package manager (PM, for short) downloads the resolved tar-file;
- Extracts it locally to the user/site specific area;
- And then invokes some predefined script for "building" and installing those sources to the locally installed distribution.
CTAN (“Comprehensive TeX Archive Network”) was the 1st language distribution we know, which has established such handy practice to install contributed content (TeX packages and extensions) from central repository. However, real explosion to this model happened when Perl community started to employ this same model – since the moment of CPAN (“Comprehensive Perl Archive Network”) inception in the 1995 it has collected "177,398 Perl modules in 34,814 distributions, written by 12,967 authors, mirrored on 246 servers"
This is very comfortable to work with language and within environment where for each next task you have the 1st question you ask: "Is there already a module created for XXX?" and only in a couple of seconds (well minutes, taking into consideration the internet speed in middle-late nineties) after the single command executed, say:
>cpan install HTTP::ProxyYou have this module downloaded, source extracted, makefile generated, module recompiled, all tests passed, sources, binaries and documentation installed into the local distribution, and all is ready to use in your Perl environment using simple "use HTTP::Proxy;" command!
I believe that most of CPAN modules are Perl-only packages (i.e. there are only source files written in Perl, thus no extra processing is necessary, which is radically simplifying cross-platform deployment). But, also, there are additional facilities provided by Perl Makefile.pl and PerlXS, which allow to handle combination of Perl sources with some binary modules (e.g. programs or dynamic modules, which are usually written in C, which sources will be downloaded and recompiled locally, using locally installed, target specific compiler and the local ABI).
And interesting twist of this story is with statistical language R, which was not very famous and so widespread as Tex or Perl decades ago. They used the same model as used by Tex developers in CTAN, and Perl developers in CPAN, in [surprisingly named] CRAN (“Comprehensive R Archive Network”). The similar repository (archive) of all available sources, and similar infrastructure for quick download and easy install. Regardless the fact that the language was "relatively rarely used R", CRAN has accumulated 6000+ packages of extensions. [Quite respectful amount of useful modules in repository or such “niche” language, IMO]
Then, many, many years after, this big repository helped R to return data scientists’ attention when BigData trend restored R popularity during this decade. Because you already had big ecosystem, with multitude of modules to experiment with.
BSD family: FreeBSD Ports, NetBSD pkgsrc, and Darwin Ports
At the same period in the middle of 90-ies, FreeBSD introduced their own way to distribute open-source software via their own "ports collection". Various BSD-derivatives (like OpenBSD and NetBSD) maintained their own ports collections, with few changes in the build procedures, or interfaces supported. However, in any case the basic mechanism was the same after `cd /port/location; make install` invoked:
- Sources installed from appropriate media (be it CD-ROM, DVD or internet site);
- Application built using the given Makefile and locally available compiler(s);
- And build targets installed according to the rules written in the Makefile or some different package definition file;
Even, there was an option to handle all dependencies of a given port if there was a request, so full installation for bigger package could be initiated via single, simple command and package manager handled all recursive dependencies appropriately.
From the license and their kernel predecessors prospective we might consider Darwin Ports/MacPorts as the derivative of this BSD port collection idea – we still have the collection of open source software, which is conveniently handled by a single command, i.e.:
$ sudo port install apache2As one might recognize, until the moment both language-based repositories we covered (CTAN/CPAN/CRAN) and operating system BSD collections (FreeBSD/OpenBSD/NetBSD/MacPorts) were all representing the same class of package-managers - sourcecode-based package managers. But there is different kind the same important, and we will cover it shortly.
Binary package managers - Linux
Sourcecode-based package management model is working quite well till some moment, and could produce impression of full transparency and full control. But there are few "small" problems:
- Not everything could be distributed in their source form. There is real life beyond open-source software, and for proprietary software there is still some need to deploy it conveniently;
- And, even for the open source projects, but big ones, the full procedure of its rebuild may took a huge chunk of time (multiple hours). Hardly acceptable for many and and not very convenient to deal with;
There was legitimate request to create a way to distribute packages (with all their dependencies) in binary form, when they already compiled for the target hardware architecture and ready for consumption. Thus introduce binary package formats, and the 1st of them of some interest for us – is the .deb format use by Debian package manager (dpkg). Original format, introduced in the Debian 0.93 in the March 1993, was the simple tar.gz wrapper with some magic ASCII prefixes. Currently .deb package is both simpler and more complex – it's just the AR archive consisting of 3 files (debian-binary with version, control.tar.gz with metadata and data.tar.* with the installed files). You will not use dpkg in the real life - most current Debian-based distributives are using APT (advanced packaging tool) instead. Surprisingly (at least for me) that APT has outgrown Debian distros, and has been ported to Red Hat based distros (APT-RPM), or Mac OS X (Fink), or even Solaris.
The apt-get' rich functionality and easiness has influenced all package managers created since then.
The different good example of binary packaging systems is the RPM (Red Hat Package Manager). RPM introduced with Red Hat V2.0 the late 1995. Red Hat quickly became the most popular Linux distribution (and solid RPM features was one of the factors winning competition here, till some moment at least). So it is not a big surprise that RPM started to be used by all RedHat-based distributions (e.g. Mandriva, ASPLinux, SUSE, Fedora or CentOS), and even far beyond of Linux - it was used by Novell Netware, or IBM AIX. [Though, let’s admit it, it didn’t help Netware that much]
Similar to how APT is wrapper for lower level dpkg, there is Yum as wrapper for RPM packages. Yum is more frequently used by end-users, and provides similar (to APT) high-level services like dependency tracking or building/versioning.
Mobile software stores: iOS App Store, Android Market/Google Play
Since the introduction of Apple iOS App Store, and later Google Android Market, we have received (most probably) most popular software repositories, which we have seen to date. They are essentially OS specific binary package managers with extra API for online purchases.
Although, this is not (yet) an issue for App Store, but is an issue for Android Market/Google Play – there are multiple hardware architectures used by Android devices (ARM, X86 and MIPS at the moment), so there are some extra care should be done before customer could download and install binary package containing executable code for some application. Given hardware agnostic Java code, you either supposed to compile Java-to-native binary upon installation on the target device, or repository itself could take care about this and recompile the code (e.g. with full optimizations enabled) on the cloud, before downloading to the customer device.
In any case, regardless of where and how such optimizing native adaptation is done, this part of installation process is considered a major part of software packaging services done by operating system facilities. If software supposed to be running on many hardware architectures, and if we are not deploying software in the source-code form (as we did in BSD or Linux cases) then this is repository and package manager responsibility to handle target platform problem transparently and in an some efficient manner.
For a time being, though, while we are not yet talking about binary packages, we are not considering any cross-platform issues (at least not in the possible 1st iteration of a package manager). We may return to this question this question later, when we would need to resolve both cross-version and cross-architecture issues simultaneously.
Windows applications: Chocolatey Nuget
It was a long-standing missing feature in Windows ecosystem - despite the popularity of Windows on the market, we didn't have any central repository, as convenient as was apt-get for Debian, or Yum/RPM for Red-Hat, where we could easily find and install any (many/most) of available applications.
On some side, there used to be Windows Store for Windows Metro applications (but nobody wanted to use them in any case :) ). On the different side, even before Windows Store story, there used to be nice and convenient NuGet package manager, installed as plugin to Visual Studio. Generic audience impression was that it was only serving .NET packages, and was not targeting the wider case of "generic Windows desktop applications".
Even farther, there was(is) Cygwin repository, where you could download (quite conveniently though) all known GNU applications ported to Cygwin (from bash, to gcc, to git, or X-Window). But, this, once again, was not about "any generic windows application", but only about ported POSIX (Linux, BSD, and other UNIX compatible APIs) applications which could be recompiled using Cygwin API.
That's why development of Chocolatey Nuget in 2012 got me as a nice surprise: having NuGet as a basis for package manager, added some PowerShell woodoo upon installation, and given some central repository here you could pretty much have the same convenience level as with apt-get in Linux. Everything could be deployed/wrapped as some Chocolatey package, from Office 365, to Atom editor, or Tortoise Git, or even Visual Studio 2015 (Community Edition)! This quickly became the best friend of Windows IT administrator, and many extra tools used Chocolatey as their low-level basis have been developed, best example of such is BoxStarter, the easiest and fastest way to install Windows software to the fresh Windows installations.
Chocolatey shows nothing new, which we haven’t seen before in other operating systems, it just shows that having proper basis (NuGet as a package manager, PowerShell for post-processing, + capable central repository) one could built generic package manager which will attract attention quite fast, even for the operating system where it was unusual. BTW, worth to mention that Microsoft decided to jump to the ship, and Chocolatey culd be used as one of repositories, which will be available in their own OneGet package manager to be available since Windows 10.
On a personal note, I should admit, I do not like OneGet as much as I like Chocolatey – there is too much PowerShell scripting I’d need to plumbing for OneGet. And from user experience prospective Chocolatey hides all these details, and is looking much, much easier to use.
JavaScript/node.js NPM
There are multiple factors, which have led to recent huge success of JavaScript as a server-side language. And one of most important factors in this success (at least IMVHO) - the availability of central Node.js modules repository - NPM (Node Package Manager) . NPM is bundled with Node.js distribution since version 0.6.3 (November 2011).
NPM is apparently modeled similar to CPAN: you have a wrapper, which from command-line connects to central repository, search for requested module, download it, parse package metainfo, and if there are external dependencies it could then process this recursively. In a few moments, you have working binaries and sources available for local usage:
C:\Users\Timur\Downloads>npm install -g less
npm http GET https://registry.npmjs.org/less
npm http 304 https://registry.npmjs.org/less
npm http GET https://registry.npmjs.org/graceful-fs
npm http GET https://registry.npmjs.org/mime
npm http GET https://registry.npmjs.org/request
…
npm http GET https://registry.npmjs.org/isarray/-/isarray-0.0.1.tgz
npm http 200 https://registry.npmjs.org/isarray/-/isarray-0.0.1.tgz
npm http 200 https://registry.npmjs.org/asn1
npm http GET https://registry.npmjs.org/asn1/-/asn1-0.1.11.tgz
npm http 200 https://registry.npmjs.org/asn1/-/asn1-0.1.11.tgz
C:\Users\Timur\AppData\Roaming\npm\lessc -> C:\Users\Timur\AppData\Roaming\npm\node_modules\less\bin\lessc
less@2.0.0 C:\Users\Timur\AppData\Roaming\npm\node_modules\less
├── mime@1.2.11
├── graceful-fs@3.0.4
├── promise@6.0.1 (asap@1.0.0)
├── source-map@0.1.40 (amdefine@0.1.0)
├── mkdirp@0.5.0 (minimist@0.0.8)
└── request@2.47.0 (caseless@0.6.0, forever-agent@0.5.2, aws-sign2@0.5.0, json-stringify-safe@5.0.0, tunnel-agent@0.4.0, stringstream@0.0.4, oauth-sign@0.4.0, node-uuid@1.4.1, mime-types@1.0.2, qs@2.3.2, form-data @0.1.4, tough-cookie@0.12.1, hawk@1.1.1, combined-stream@0.0.7, bl@0.9.3, http-signature@0.10.0)
NPM authors introduced some good practices which started to be used in other package managers (and to which we will return in a 2nd part) - they use JSON format for describing package meta-information, instead of Yaml in Ruby, or Perl-based ones used in the CPAN. Stylistically, by many reasons, I prefer JSON, but you should understand that this is only 1 of many ways to serialize meta-data.
Interesting thing is that Javascript developers community is so huge, vibrant and fast moving, that they even have multiple alternative package-managers, like Bower (which uses different repository), or the recently published Facebook Yarn (which uses the same NPM repository, but is just faster and slimmer).
I could even try to generalize this observation - the more popular particular operating system ecosystem is, the more chances you have to end up with multiple concurrent package managers for this platform. See situation in the Linux, Windows or Mac OS X on one hand as good examples, or JavaScript package managers on the other hand. The more package managers used out there, the faster ecosystem is evolving. Having multiple package managers is not a requisite for fast ecosystems development pace, but rather good indication of one.
Simply putt - if we would eventually get to the situation where we would have several package managers with different repositories and toolset, than that would be rather indication of a good ecosystem state, not bad.
Conclusion
We have introduced enough of prehistory and have described current practices in package-management, so you, most probably, is ready to talk about package manager in more detail and their possible application in Caché environment. We did not consider the problem of metadata information and their format, package archive format and repository hosting. All these details are important when we start development of our own package manager. We will talk about all these in details in the next article in a week. Stay tuned!

